Set up SCIM with Microsoft Entra ID
This guide walks you through connecting Microsoft Entra ID to mTime with SCIM provisioning, from the first mTime setting to a verified, running sync. Follow the steps in order — everything you need is on this page.
Along the way you will: prepare mTime (steps 1–3), create and connect the Entra enterprise application (steps 4–6), create and assign the users and groups (steps 7–8), and test before going live (steps 9–11).
Step 1 — Turn on the SCIM provisioning integration in mTime
- Go to and open SCIM provisioning.
- Turn the integration on.
- Leave Link externalId to employee attribute empty unless you want employee-number matching. Empty is the default, and with it users are matched to employees by email address — which is all most workspaces need. Pick an attribute only if your identity provider sends a stable employee number and you want mTime to match on that first; choose the attribute your HR integration fills with that number. Only attributes marked unique can be linked — if the one you want isn’t listed, mark it unique in the employee attribute settings first.
- Leave Use identity provider names for employee names off unless Entra should own employee names too. Off, the name Entra sends stays on the user and the employee keeps the name HR maintains; on, it is written to the linked employee on each user’s next update as well — see Using the identity provider’s name for employees.

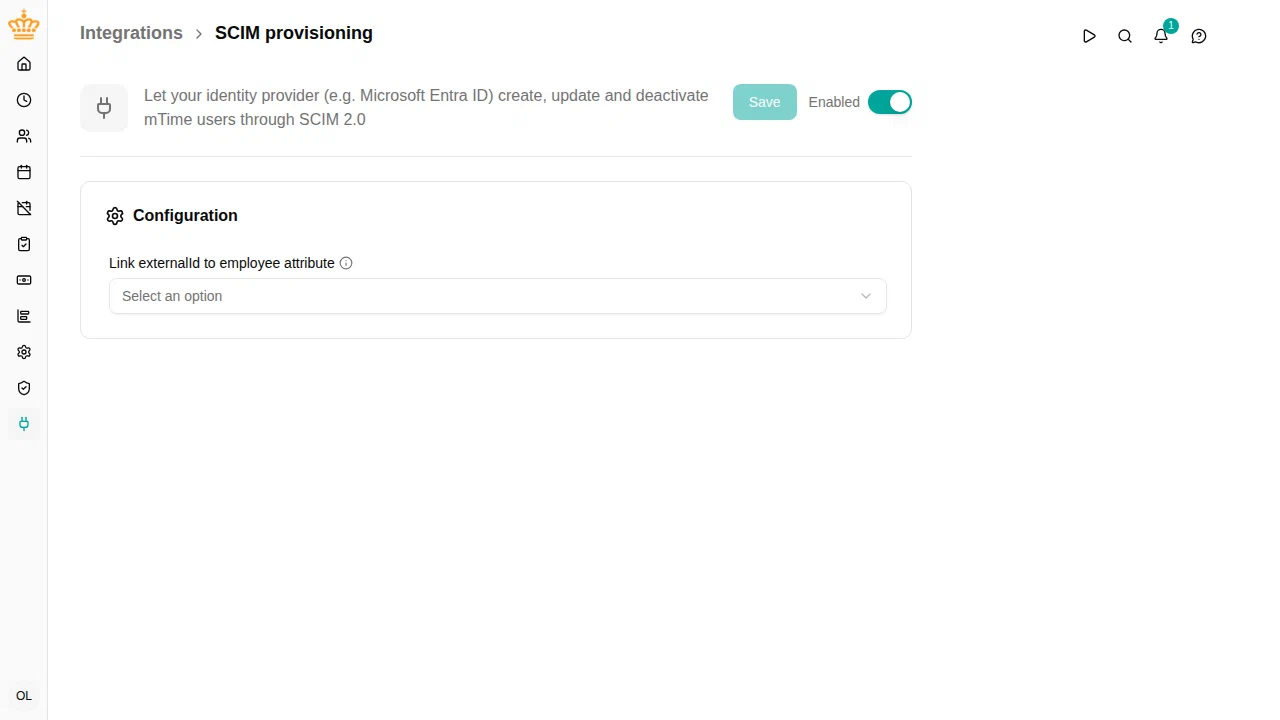
externalId is used at all. Leave it empty and you can ignore externalId for the rest of this guide — it never has to be filled in.Step 2 — Create the provisioning service user
The identity provider needs its own service account in mTime:
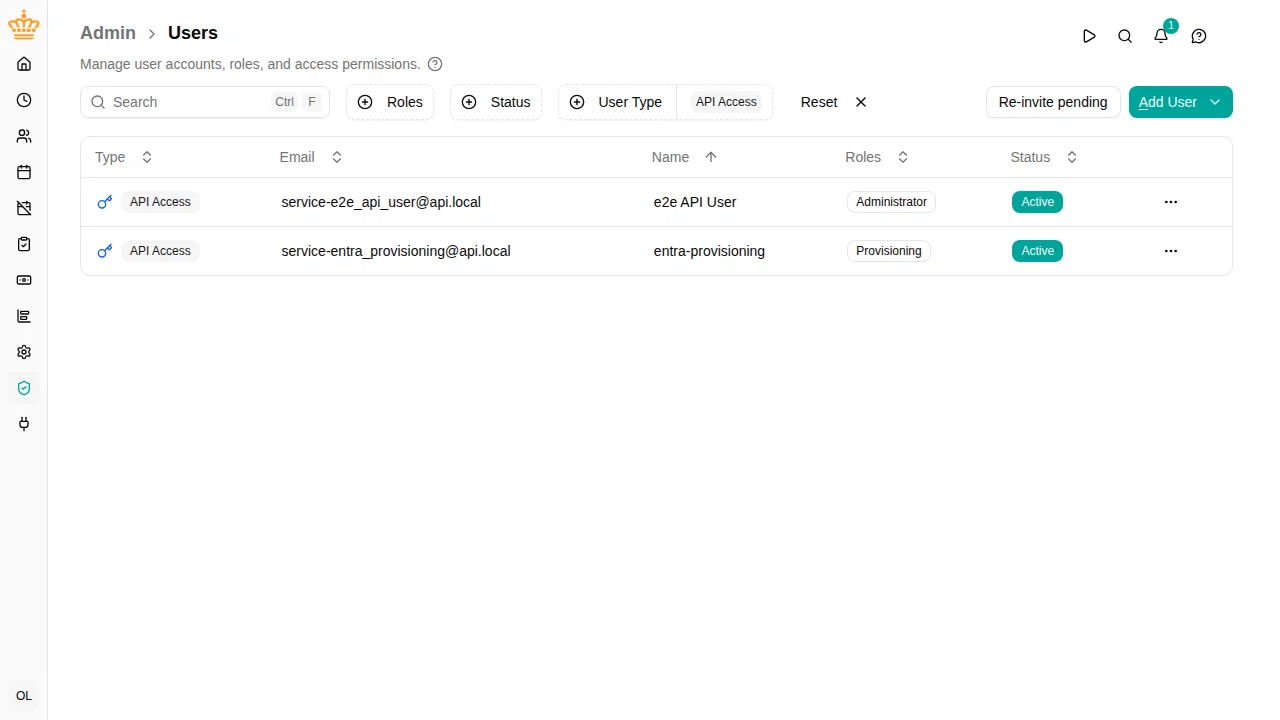
- Go to and click Create Service User .
- Name it something recognizable, e.g.
entra-provisioning. - Give it only the Provisioning role — nothing else.
Only one provisioning service user can exist per workspace. Its role is fenced: the account works exclusively on the SCIM endpoints and is refused everywhere else.

Step 3 — Create the API key
- Open the service user you just created and click Create API Key . (This only works once the integration from step 1 is on.)
- Copy the key now — it is shown only once. This is the “Secret Token” you will paste into Entra in step 5.
If you lose it, revoke the key and create a new one.
Step 4 — Create the enterprise application in Entra
Now switch to the Microsoft Entra admin center. You need a role that can create and manage enterprise applications (e.g. Application Administrator).
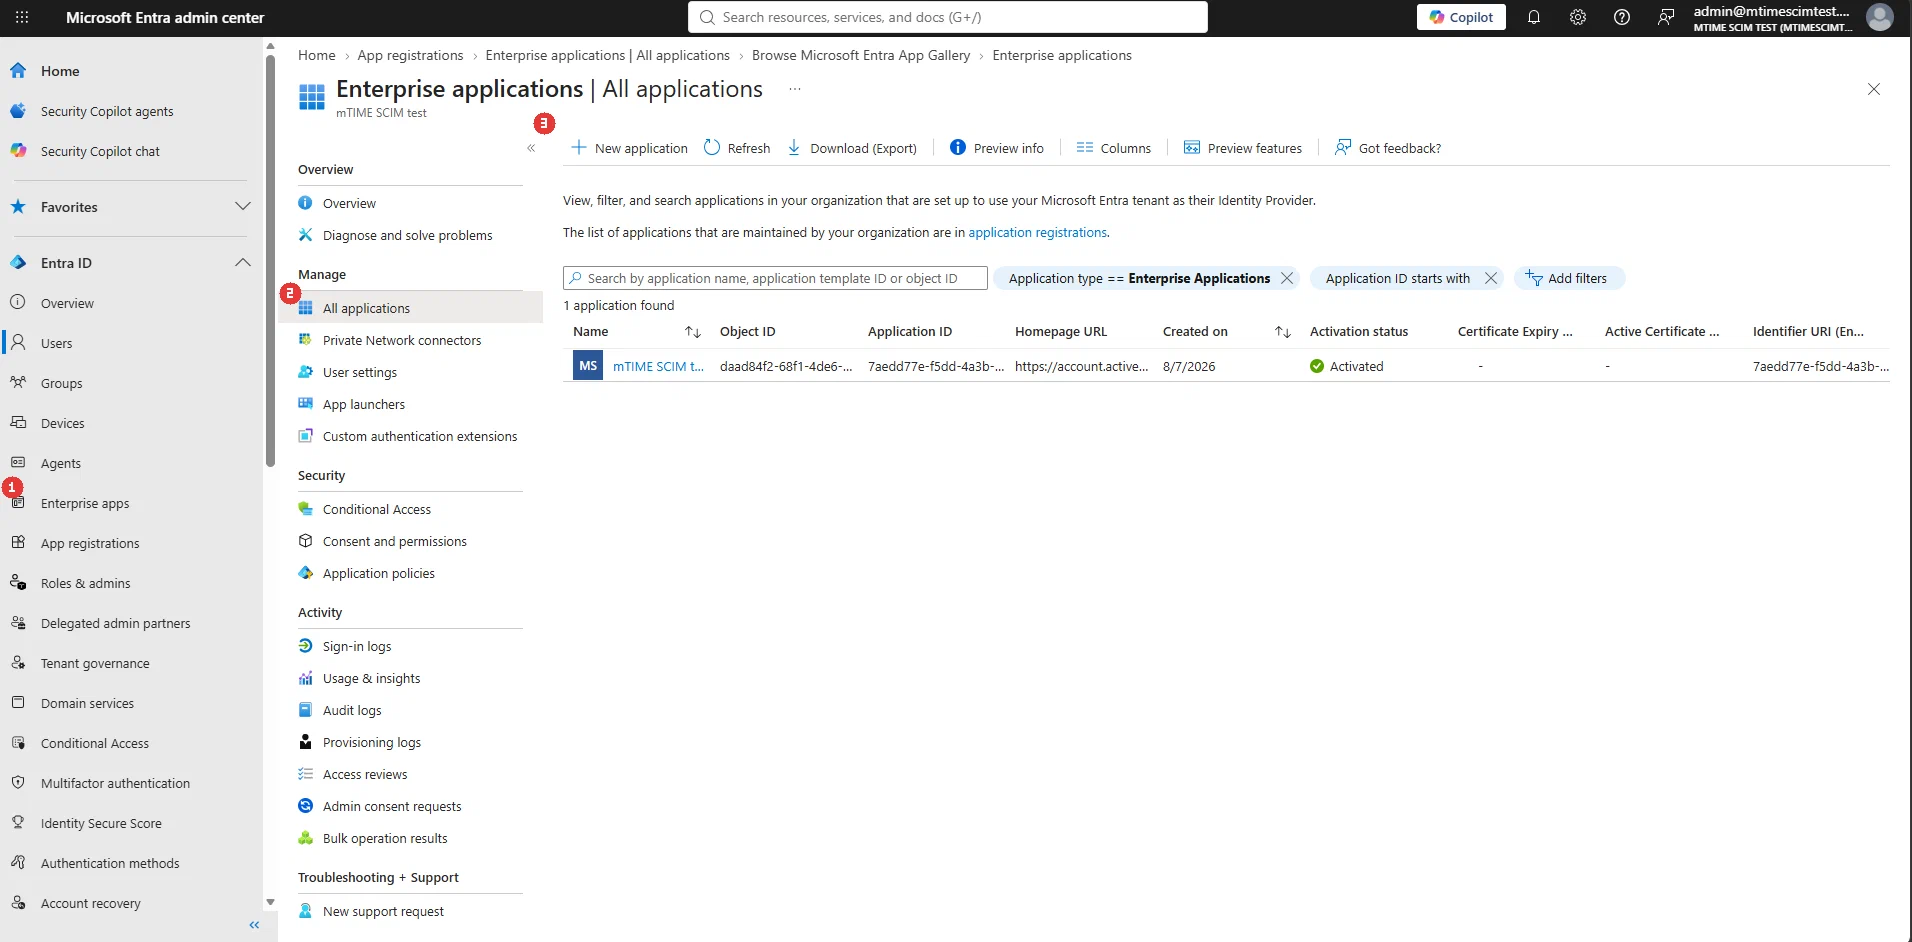
- In the left menu, go to Enterprise apps (1) > All applications (2) and click New application (3) in the toolbar above the list. This opens the Microsoft Entra App Gallery.

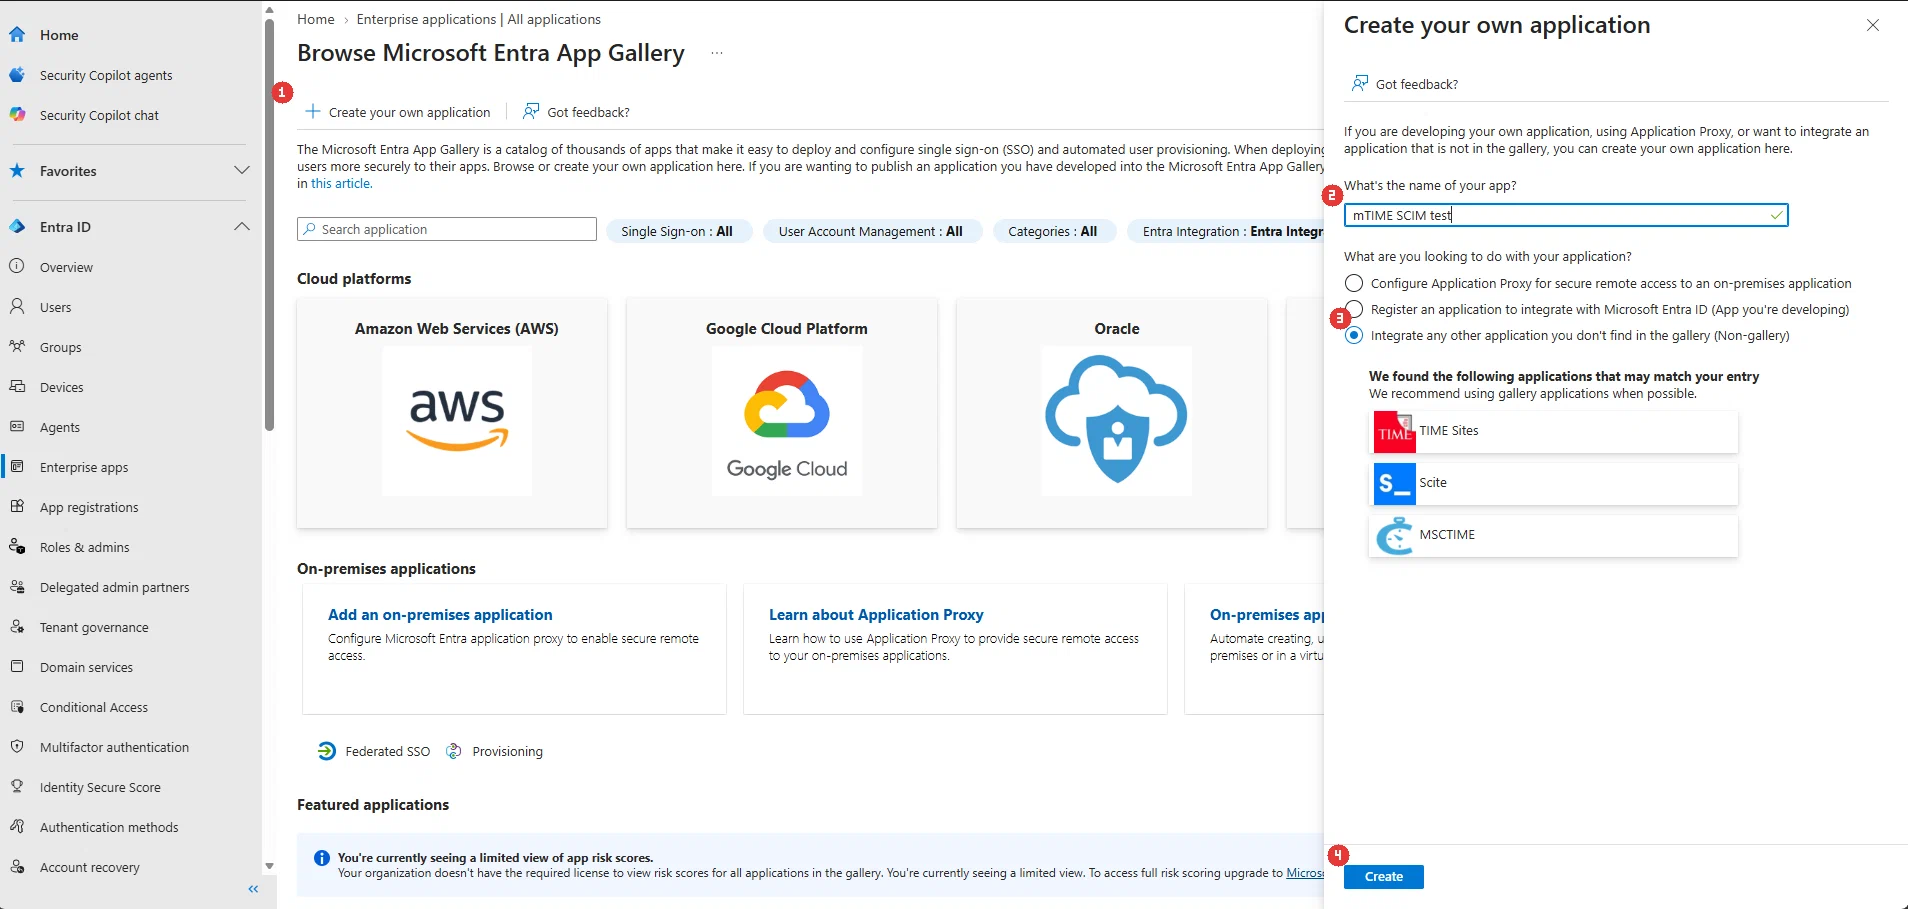
- Click Create your own application (1) at the top of the gallery page — a pane opens on the right.
- Name the app (2) — the screenshots use
mTIME SCIM test; any name works (e.g.mTime). Keep Integrate any other application you don’t find in the gallery (Non-gallery) (3) selected. Entra suggests look-alike gallery apps under the name field — ignore them, mTime is not in the gallery. The other two options create the wrong kind of object: an app registration (for software you develop yourself) has no provisioning, and Application Proxy is for on-premises apps. - Click Create (4) at the bottom of the pane.

- The new application opens, and from now on appears under All applications (1).

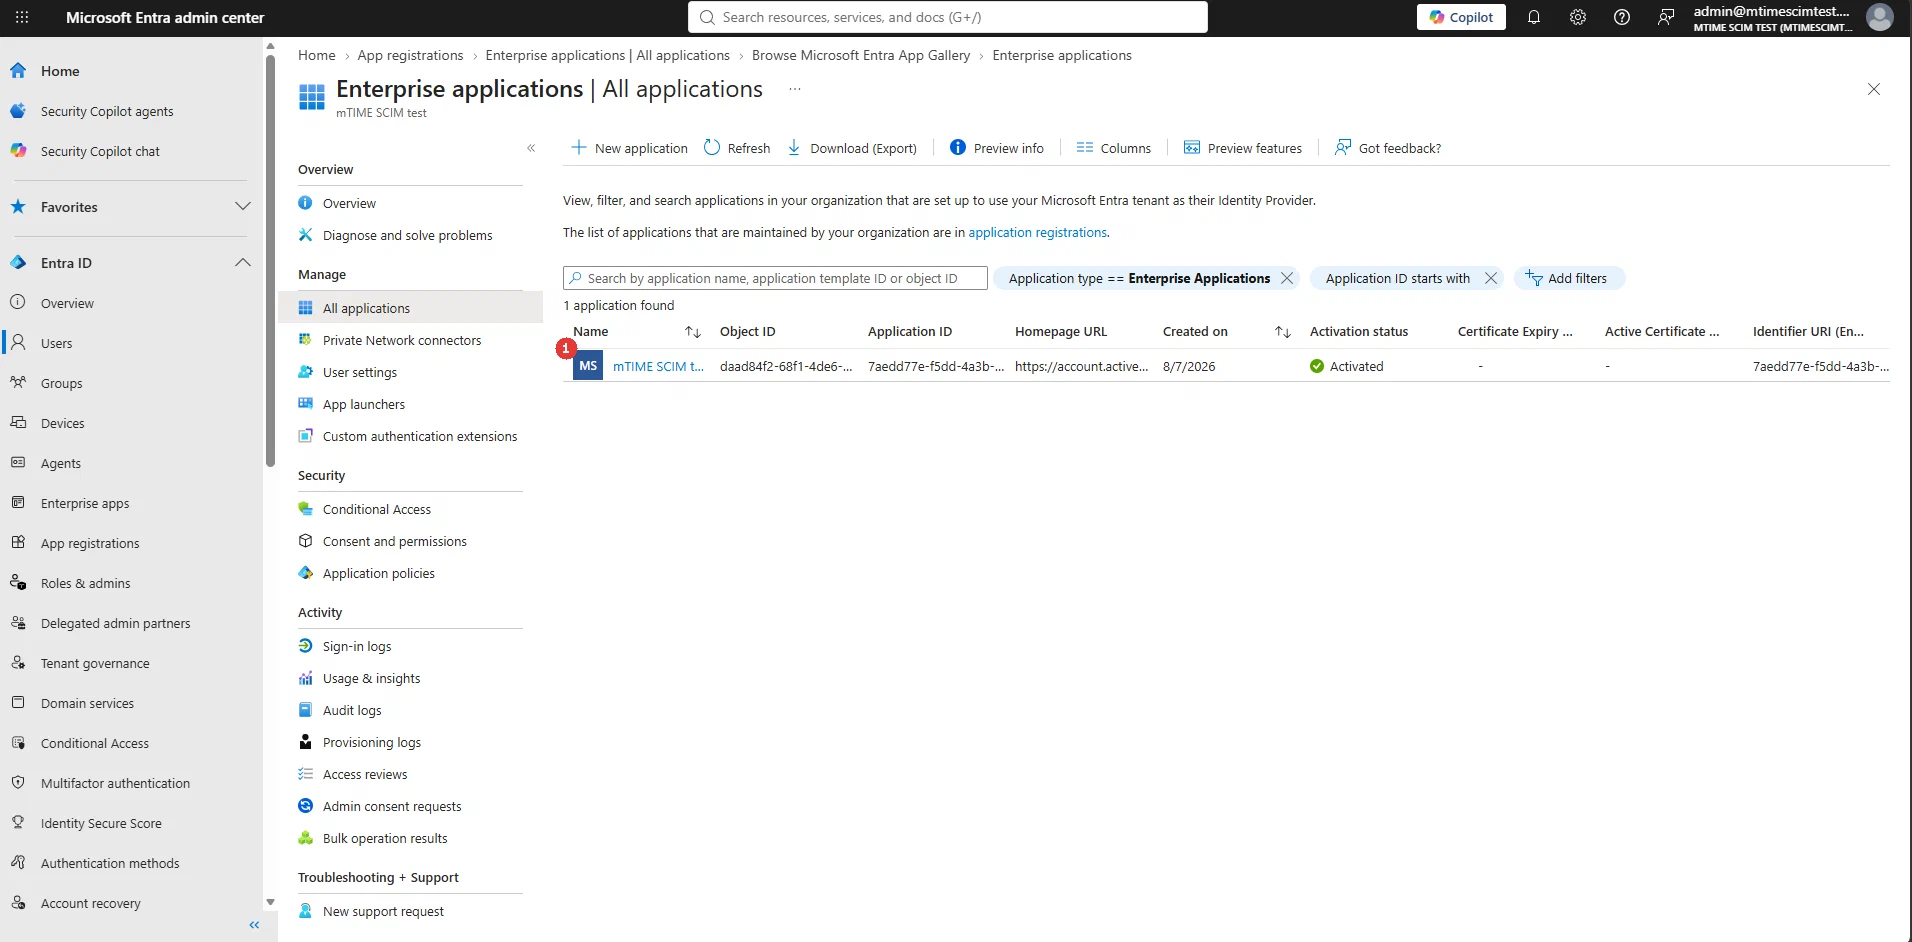
This application is where everything else happens: the connection to mTime, the attribute mappings, and the choice of which users and groups get provisioned.
Step 5 — Connect the application to mTime
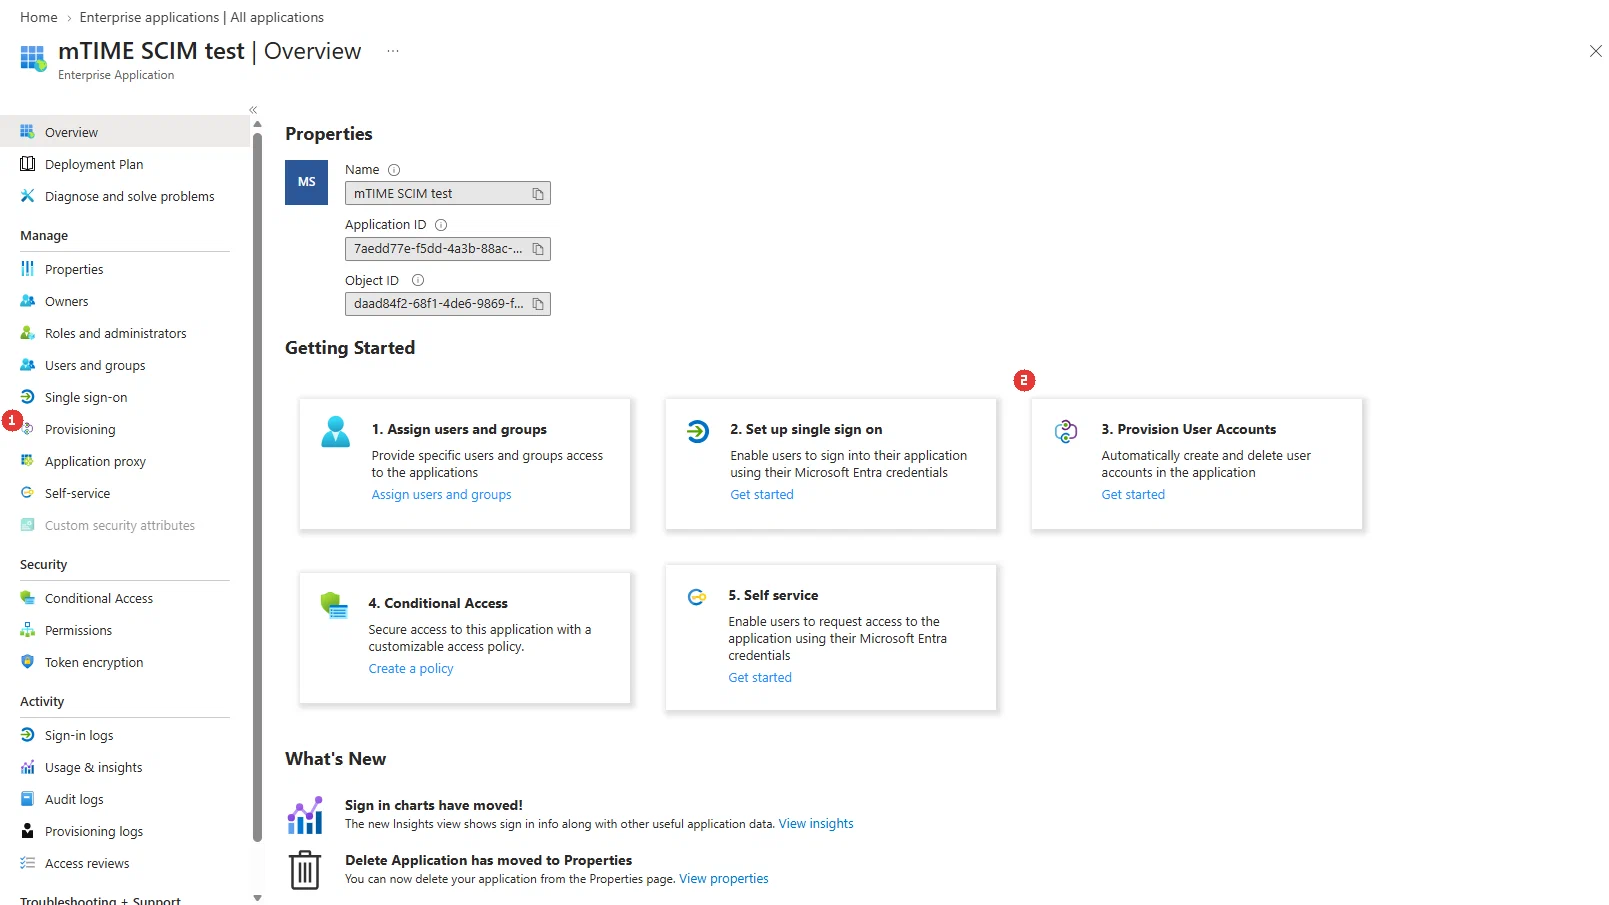
- In the application’s menu, open Provisioning (1) under Manage (the Provision User Accounts card (2) on the Overview goes to the same place).

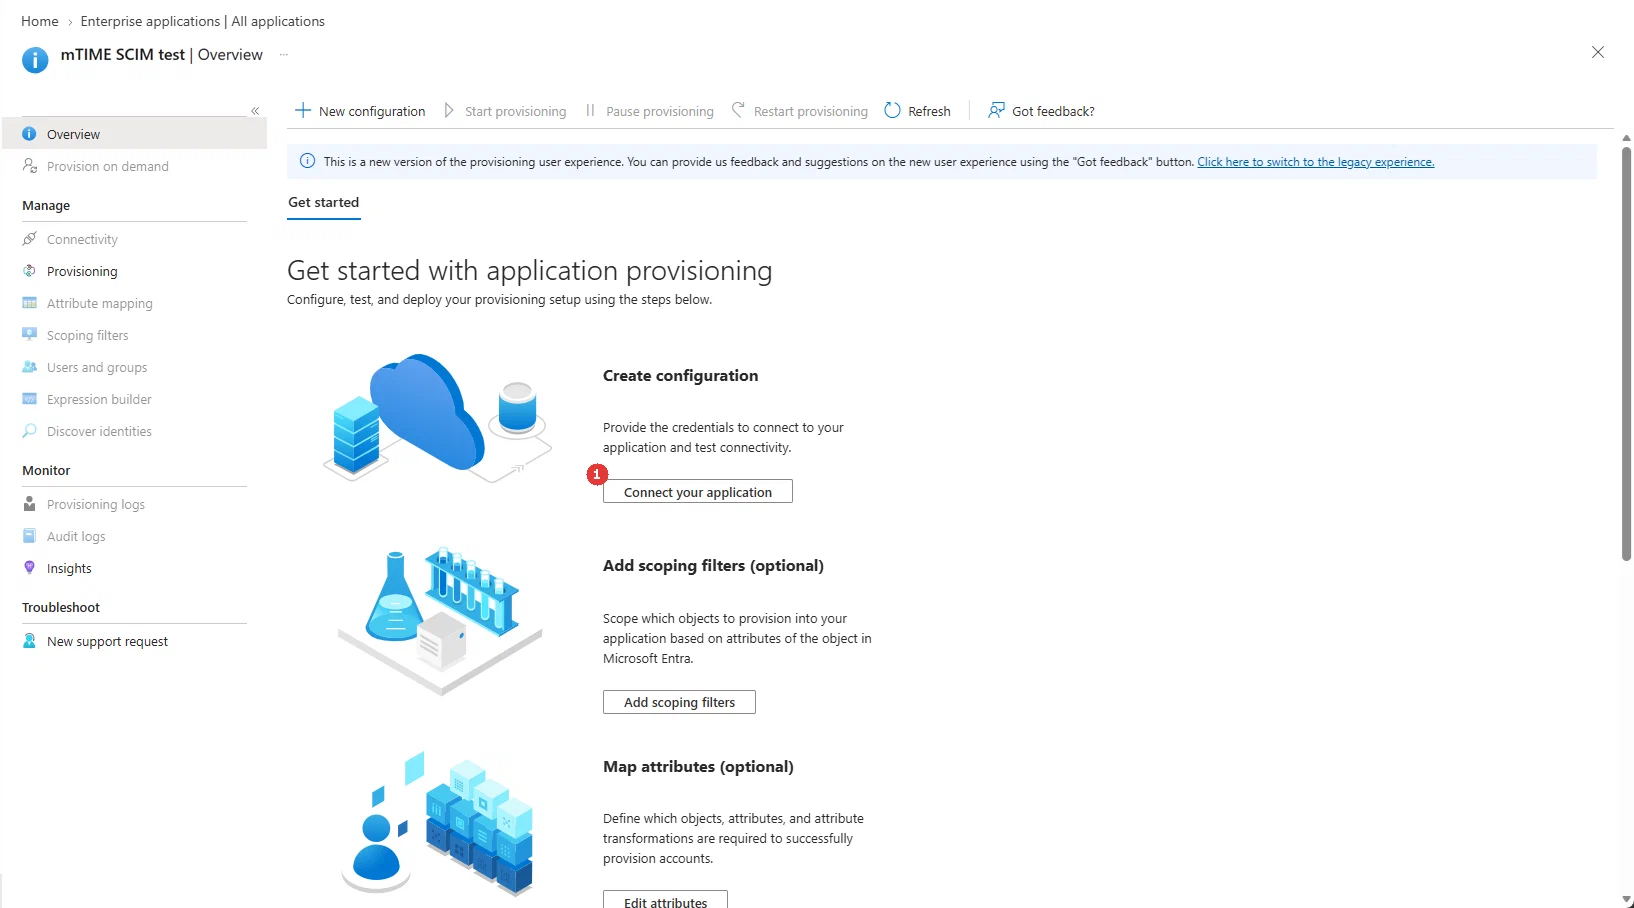
- The first time, the Get started with application provisioning page opens. Click Connect your application (1) under Create configuration. (The Connectivity menu item is greyed out until the configuration exists — this button is how you reach it; on later visits you open Connectivity directly.)

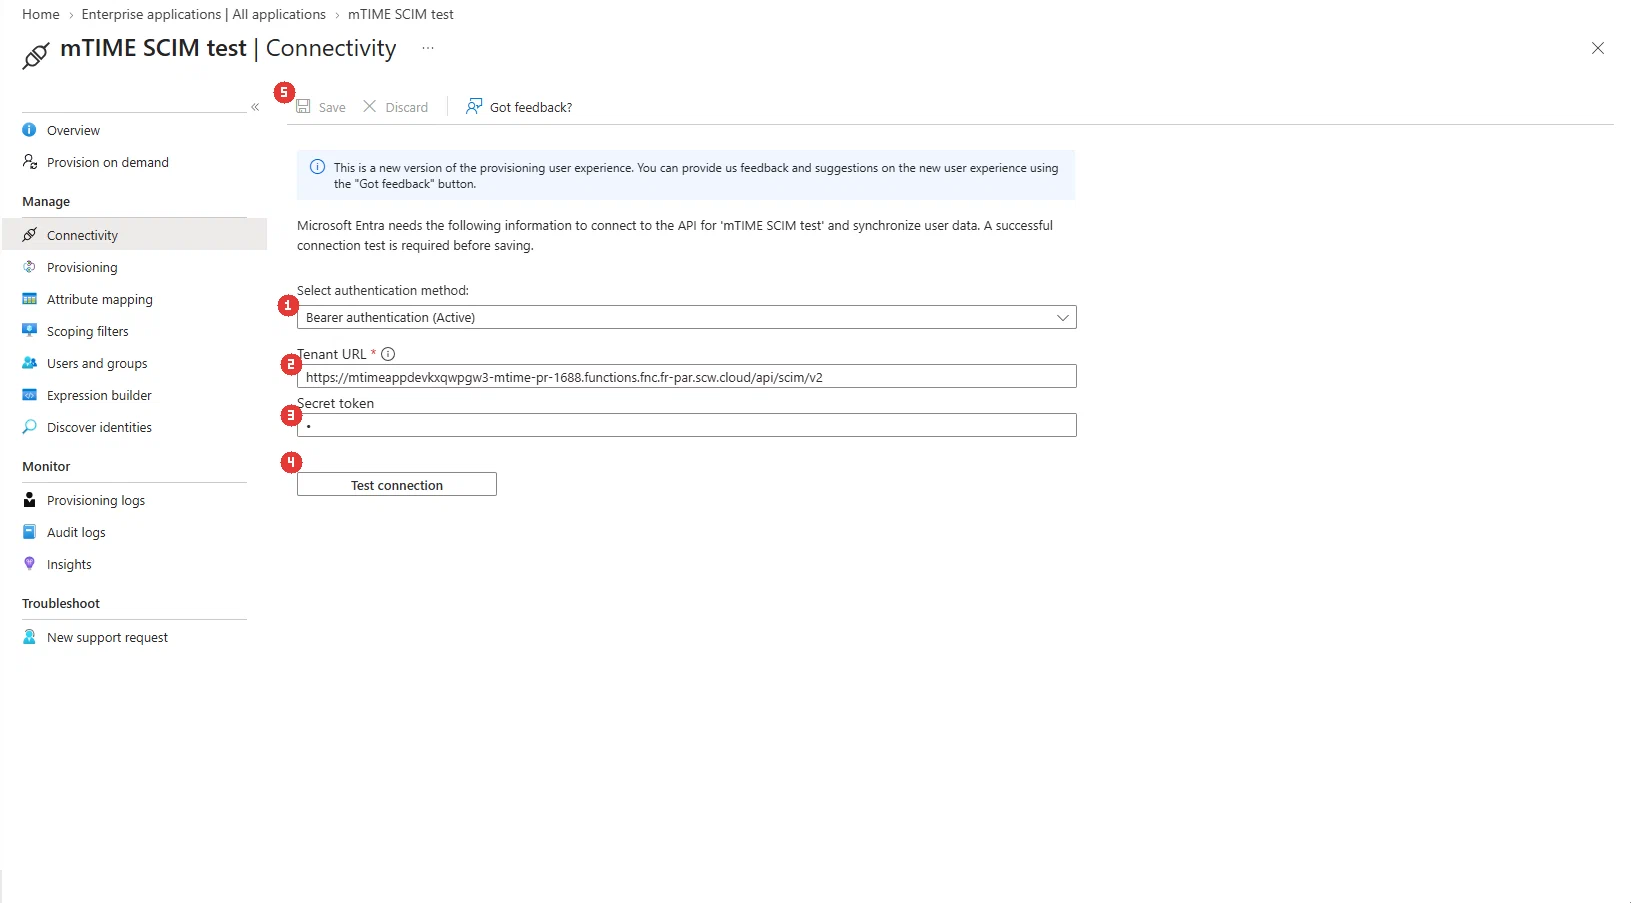
- On the Connectivity page, keep Select authentication method (1) on Bearer authentication.
- Enter the Tenant URL (2):
https://<your mTime host>/api/scim/v2— for examplehttps://mtime.example.com/api/scim/v2. - Paste the API key from step 3 into Secret token (3), right below the URL.
- Click Test connection (4). Entra calls mTime and verifies the credentials — a successful test is required before saving.
- Click Save (5) in the toolbar at the top.

| Test connection fails? | Check |
|---|---|
| Unauthorized | The secret token is not a valid API key, or the key was revoked |
| Forbidden — “SCIM endpoints require the provisioning service user’s API key” | The key belongs to another user, not the provisioning service user |
| Forbidden — “The SCIM provisioning integration is disabled for this workspace” | The SCIM provisioning integration is turned off in mTime |
| Not found / timeout | The Tenant URL is wrong — it must end with /api/scim/v2 |
Step 6 — Configure the attribute mappings
Entra decides what data mTime receives through attribute mappings. Only one of them is required: userName, which carries the email address mTime provisions and matches on.
externalId is optional — you never have to fill it in. Only map it if you picked an employee attribute in step 1 and want mTime to match users by employee number instead of by email address. Left unmapped, provisioning works exactly the same and users are matched by their email address; nothing is rejected for a missing externalId.- In the provisioning pane, open Provisioning under Manage and expand the Mappings section. It lists two mappings — Provision Microsoft Entra ID Groups and Provision Microsoft Entra ID Users — both enabled by default. Leave Groups enabled: it powers the group-to-role mapping in step 8.
- Click Provision Microsoft Entra ID Users — the Attribute Mapping list opens.
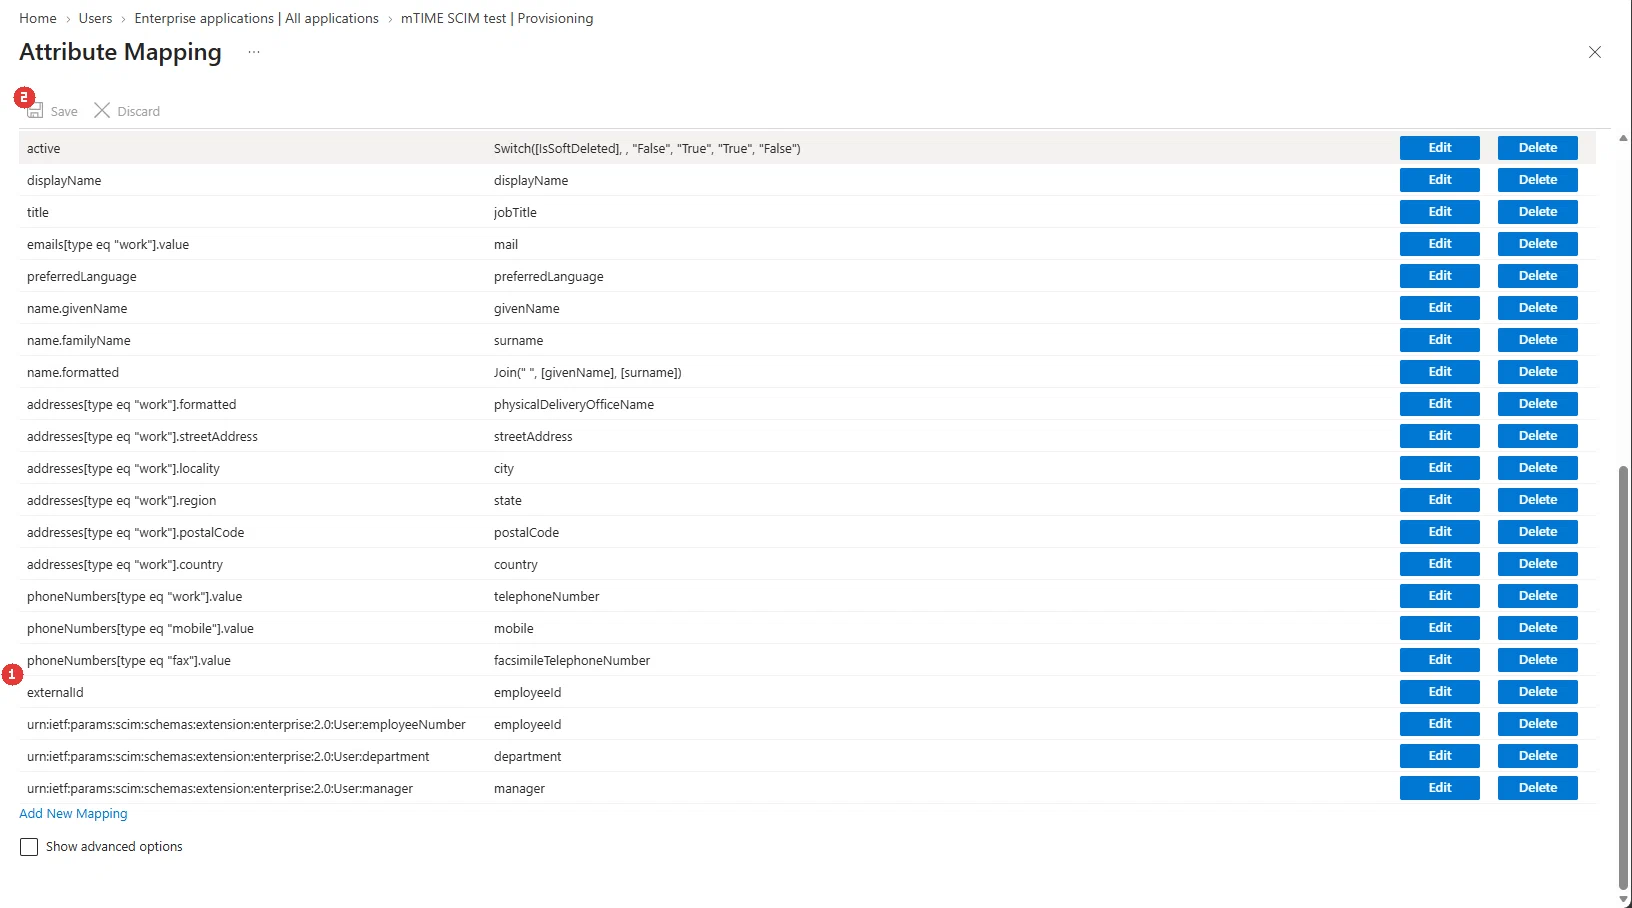
- Only if you picked an employee attribute in step 1: find the externalId row, click Edit on the right (1), and replace the default source attribute with the Entra attribute that holds the employee number — typically employeeId. Otherwise skip this and go to step 5.
- The remaining default mappings can stay as they are — mTime ignores attributes it doesn’t use. The ones that matter:
| mTime (SCIM attribute) | Fill it in? | Entra source attribute | Used for |
|---|---|---|---|
externalId | Optional — only with a linked attribute (step 1) | employeeId (or wherever your employee number lives) | Matching the user to the employee by employee number |
userName | Required | userPrincipalName | The user’s email address, sign-in identity, and the fallback way of matching the employee |
displayName | Optional | displayName | The user’s name |
active | Optional | Switch([IsSoftDeleted], , “False”, “True”, “True”, “False”) | Suspending and reactivating the user |
- Click Save (2) in the toolbar at the top.

Step 7 — Create the users and groups in Entra
The users and groups that should reach mTime live in your Entra directory. Your real employees are probably already there — this step shows the fields that matter, using a test user and a test group (the screenshots use Tina Test and Team Leads).
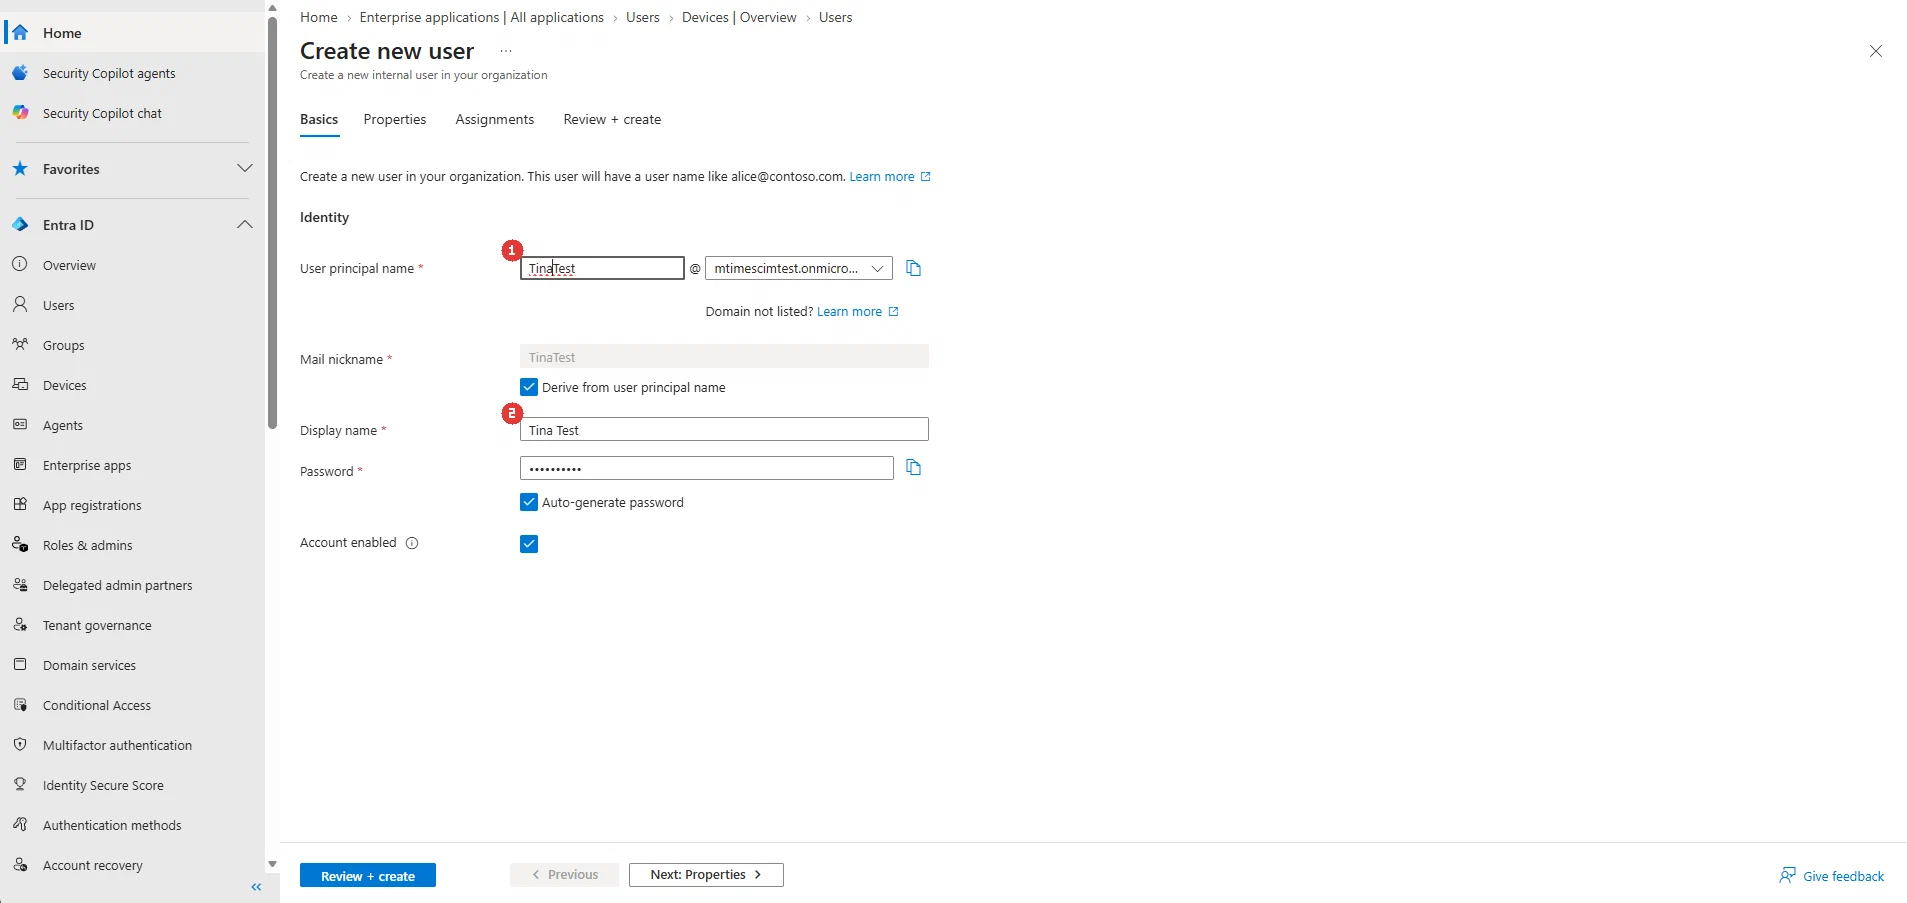
- Go to Entra ID > Users and click New user > Create new user. On the Basics tab, give the user a principal name (1) and a display name (2).

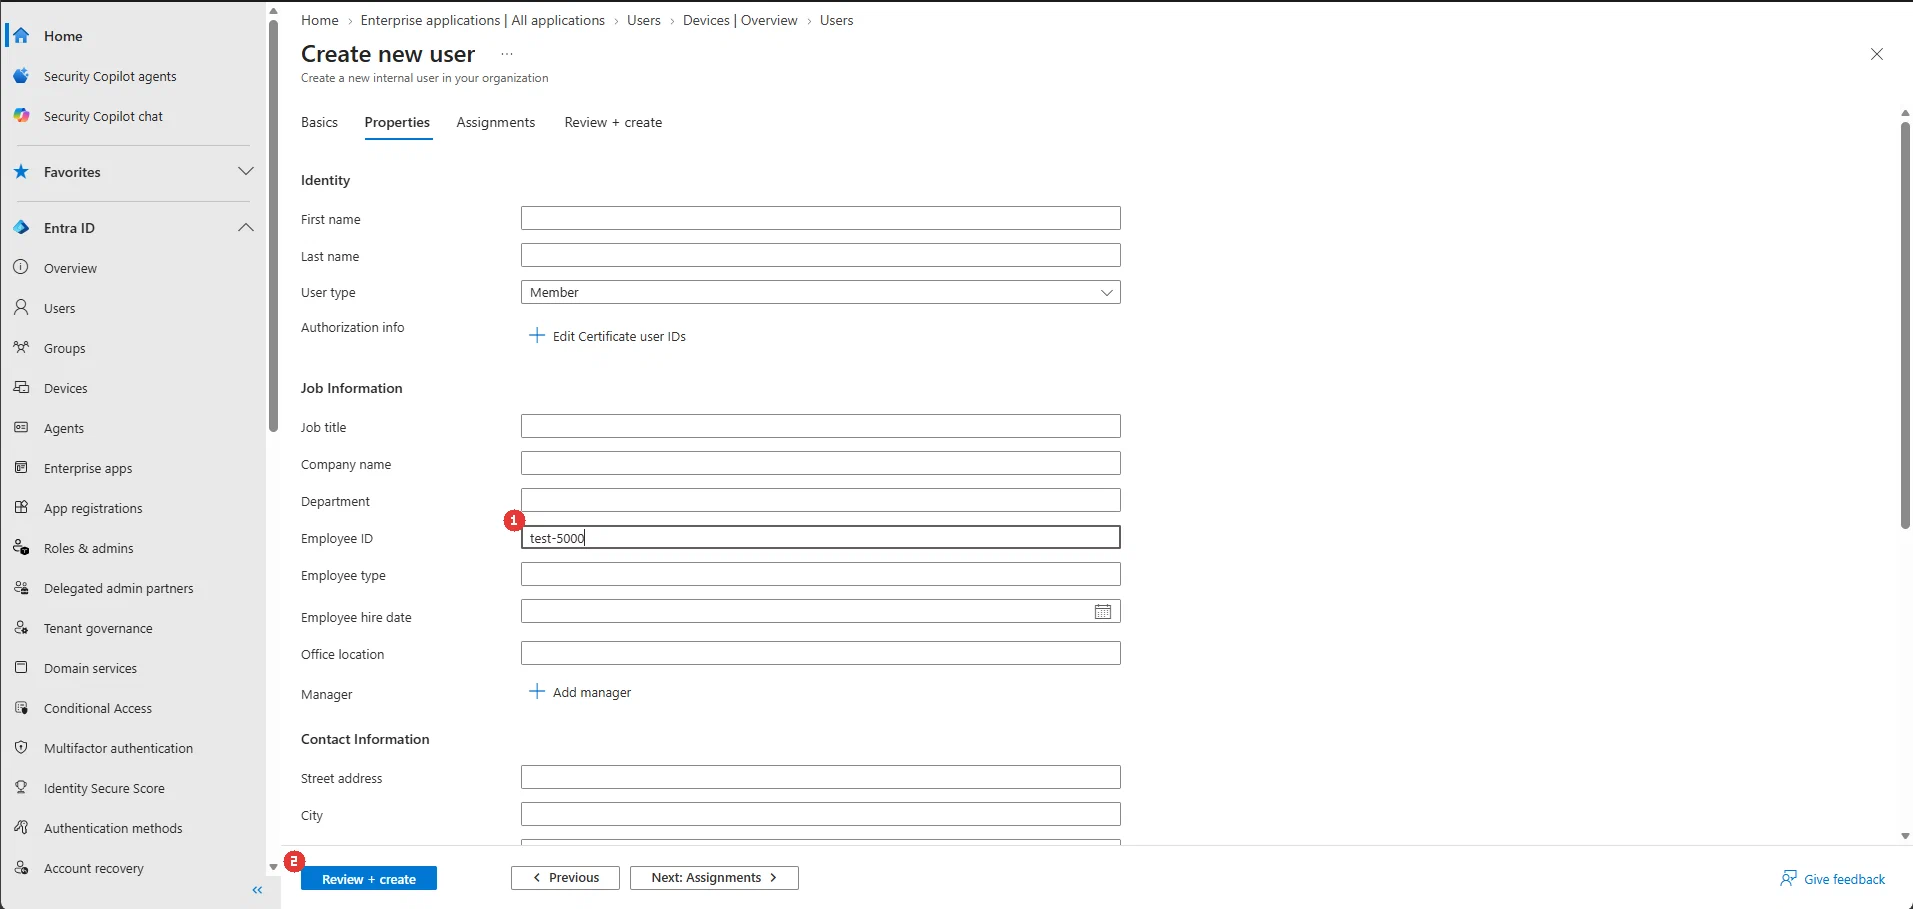
- Optional — skip this unless you picked an employee attribute in step 1. Leave Employee ID blank and mTime matches the user by email address instead. If you did pick one: on the Properties tab, fill Employee ID (1) under Job Information with the user’s stable employee number (here
test-5000) — this is what theexternalIdmapping from step 6 sends to mTime, so it must match the employee’s number in your HR data. Either way, click Review + create (2) when you are done.

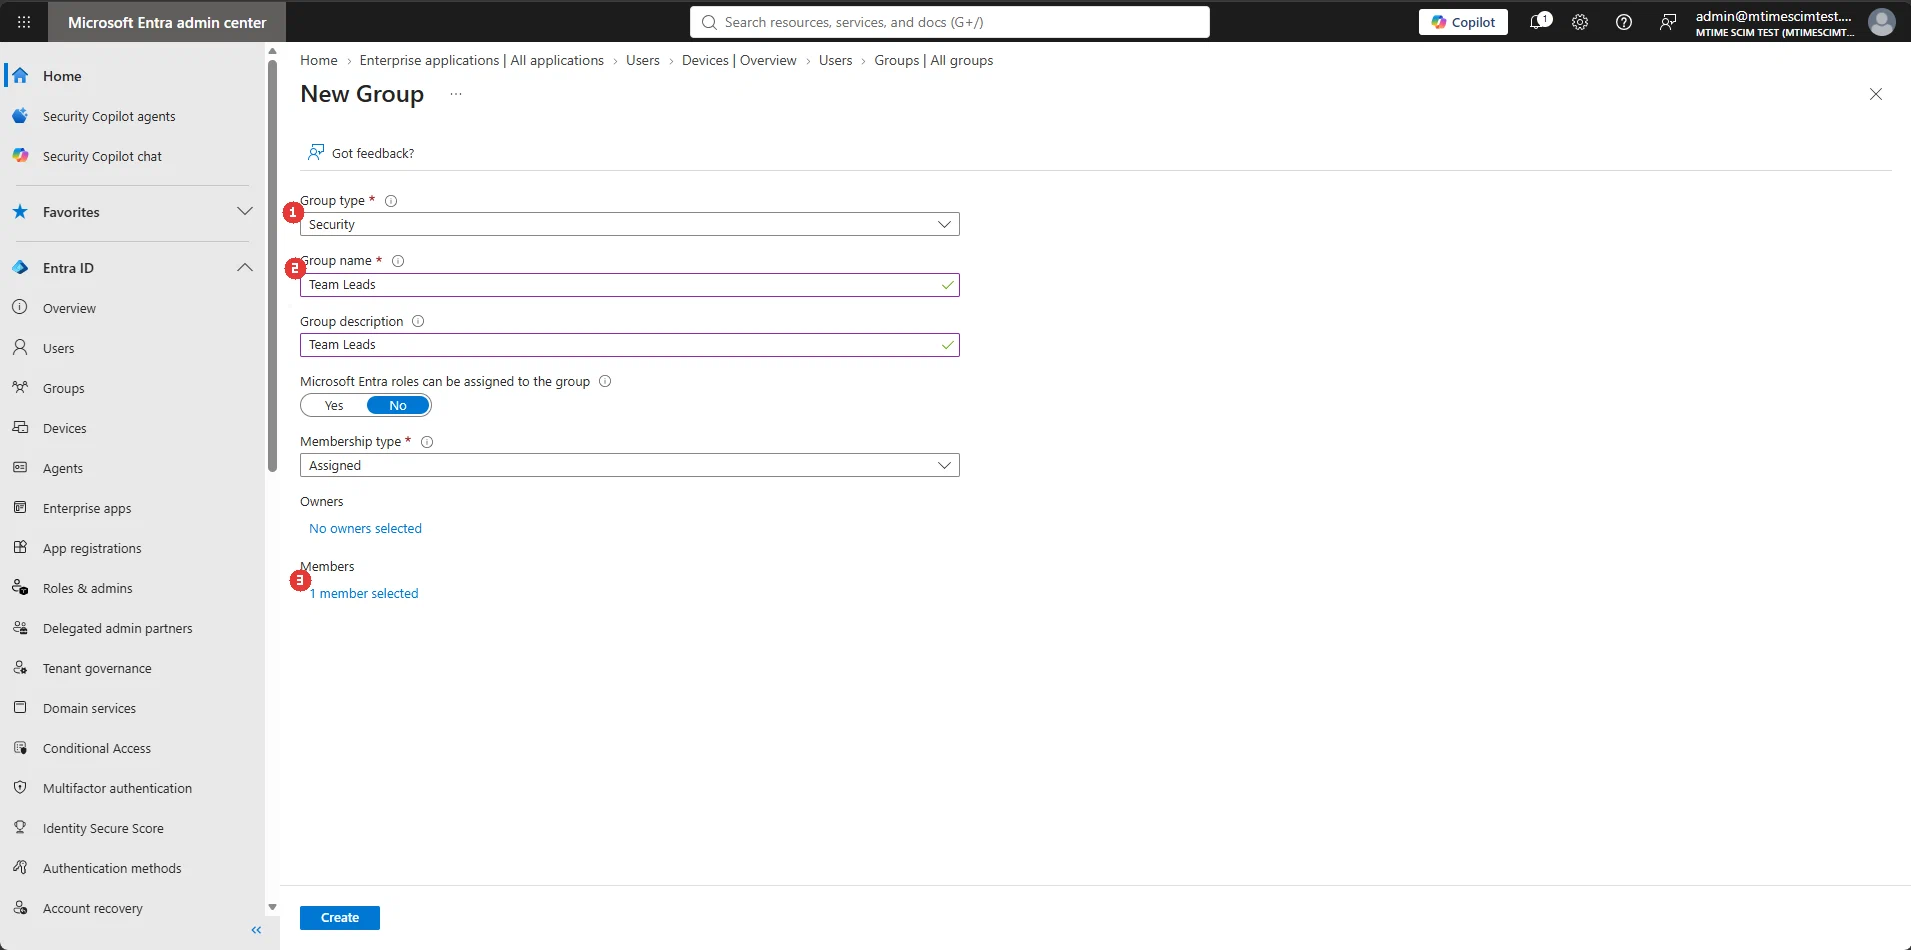
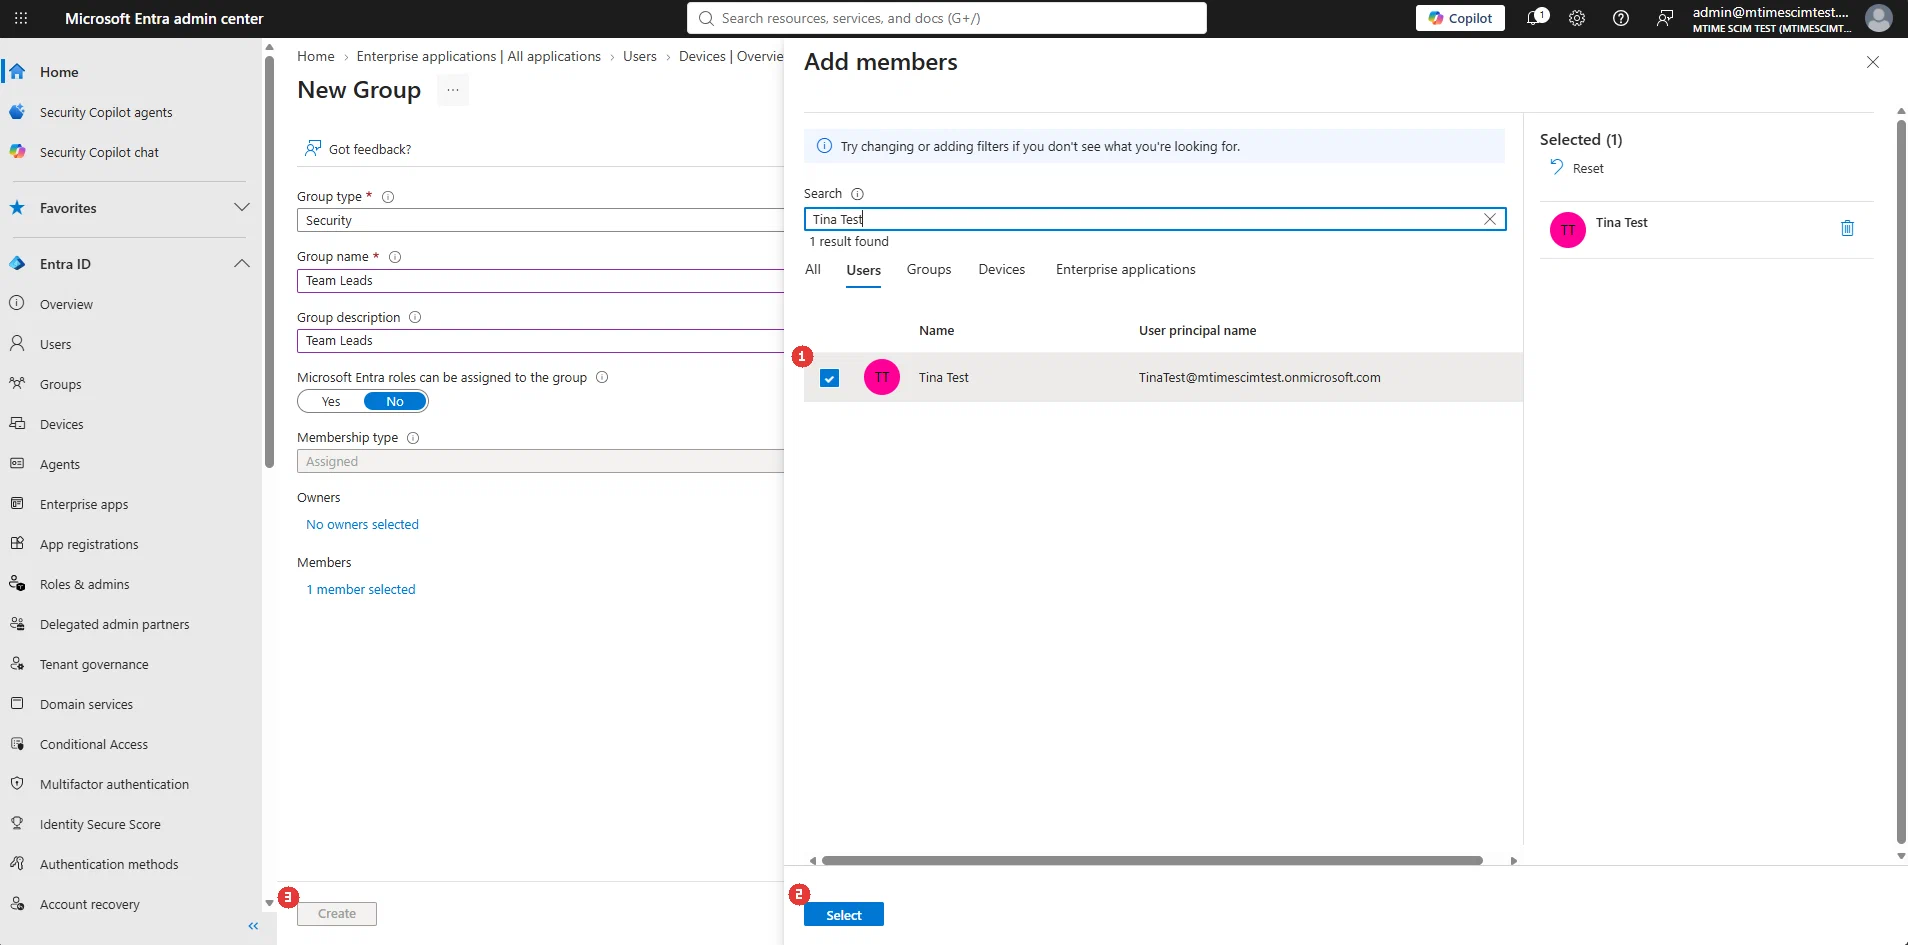
- Go to Entra ID > Groups and click New group. Keep Group type (1) on Security, name the group after the mTime role it should manage (2), and under Members click the members link (3).

- Search for the users who should hold the role and tick them (1), click Select (2) — then click Create (3).

A group can also start without members: it still creates (or links to) its mTime role, and the memberships follow whenever you add people in Entra.
Step 8 — Assign the users and groups to the application
Entra only provisions what is assigned to the application — creating a group (step 7) is not enough; the sync ignores it until it is on the app’s assignment list:
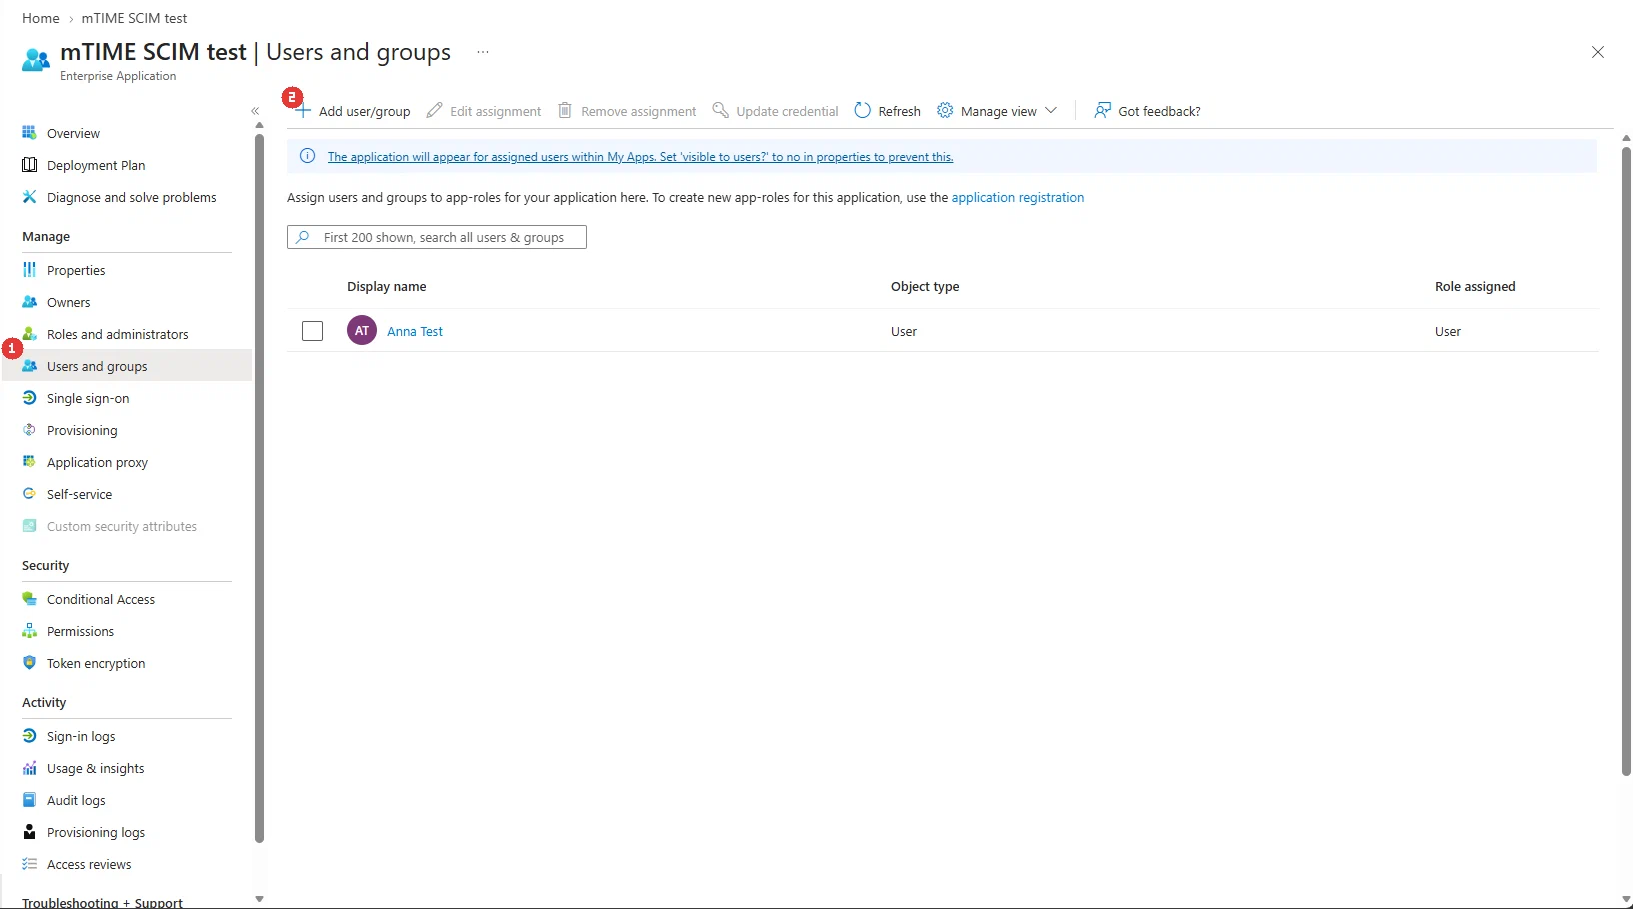
- In the application’s menu, open Users and groups (1) under Manage. The list shows everything the sync currently covers. Click Add user/group (2) in the toolbar.

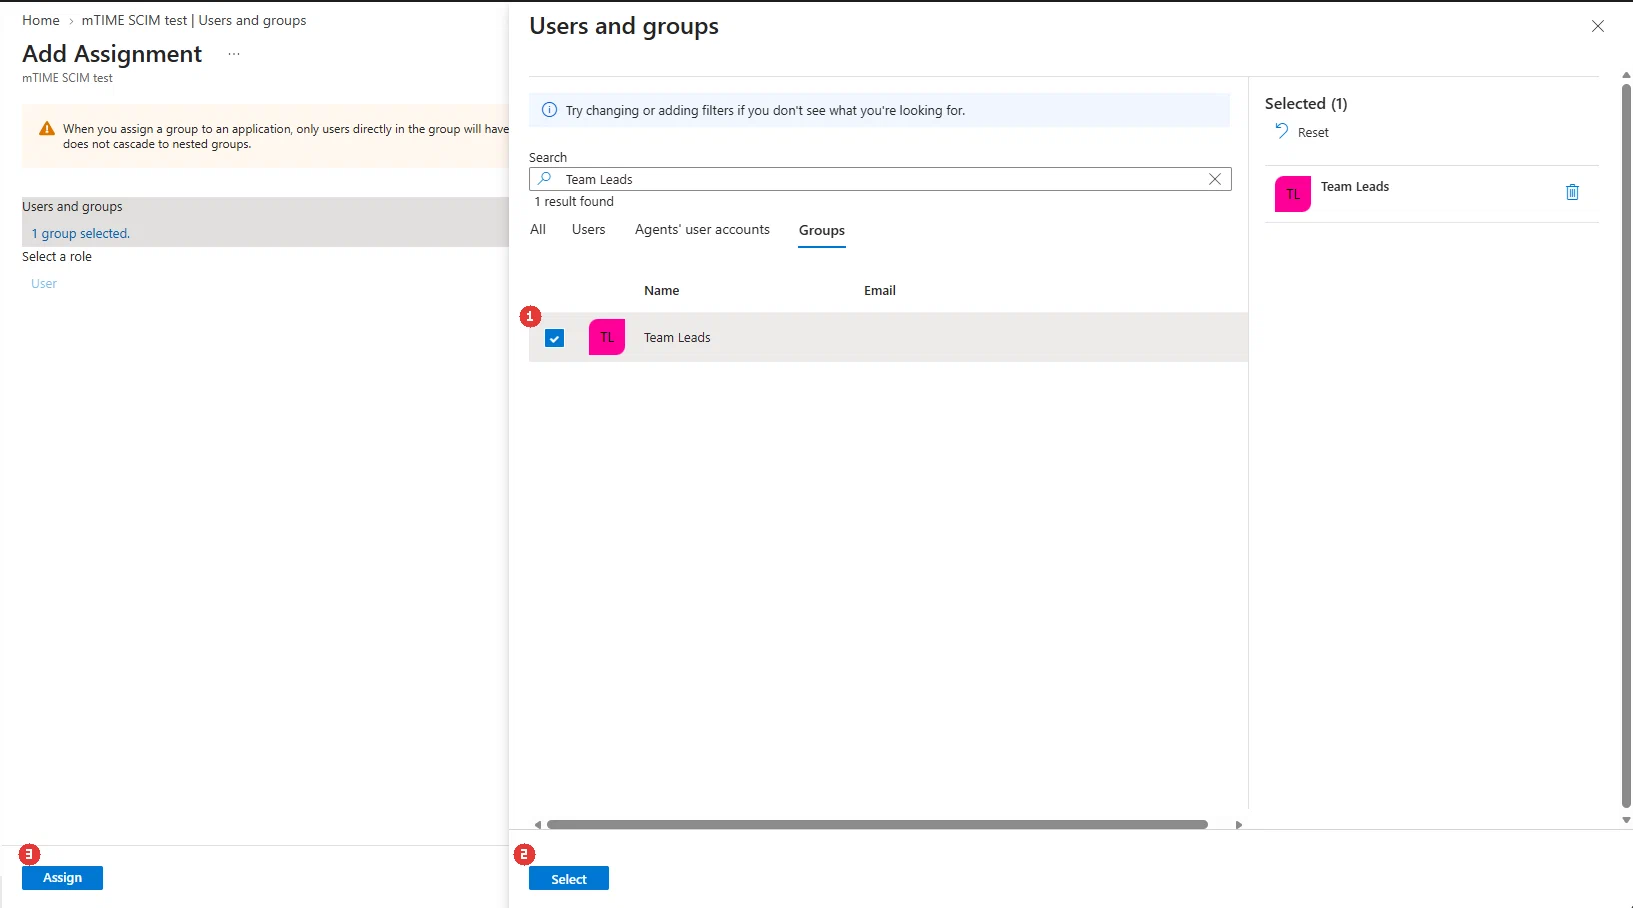
- On the Add Assignment page, open the Users and groups selector, search for the group and tick it (1), click Select (2) — then click Assign (3) at the bottom left. Mind Entra’s warning: nested groups don’t cascade, so assign each group directly.

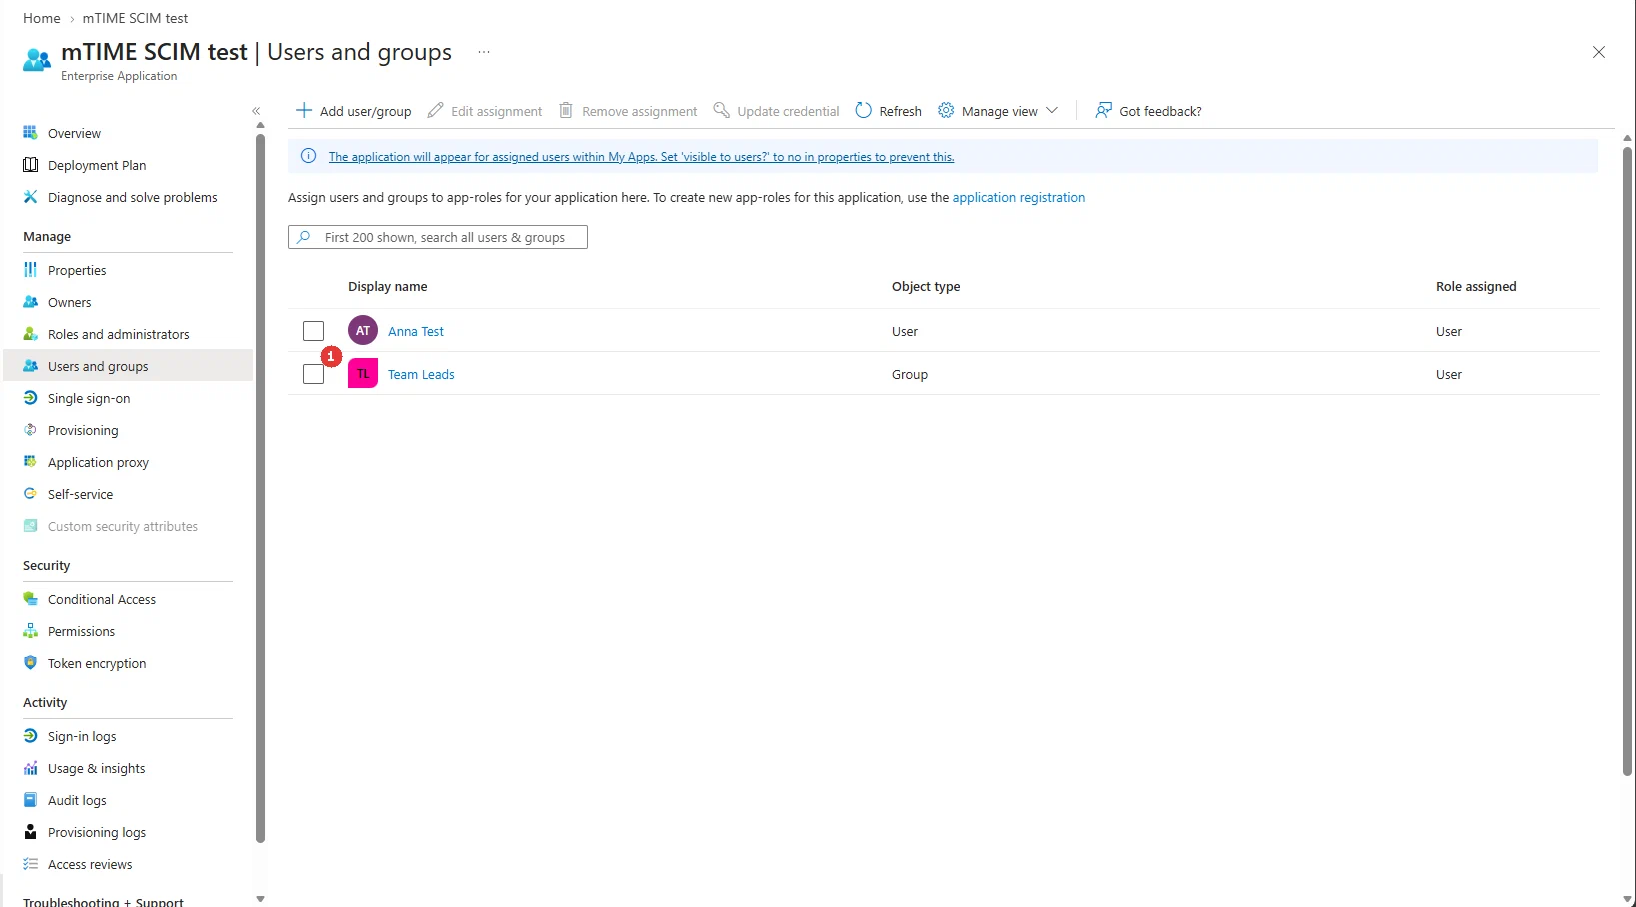
- The group now appears in the assignment list (1). Individual users can be assigned the same way.

This list is the source of truth because the provisioning Scope setting (under Provisioning > Settings) defaults to Sync only assigned users and groups — leave it there.
What arrives in mTime:
- Each assigned user becomes an mTime user — matched to the employee by the linked employee number (when configured) or by email address, or given a new minimal employee record if neither matches.
- Each assigned group becomes an mTime role. A group whose name exactly matches an existing role is linked to it; any other group creates a new empty role that an admin then configures on the Roles page.
- Group members are granted the group’s role automatically — including members added later.
hr-admin), a workspace owner must first opt that role in: open the role and add Provisioning
under Can be assigned by
. The owner role can never be managed through SCIM.Step 9 — Test with on-demand provisioning
Before starting the full sync, verify the setup with a single user:
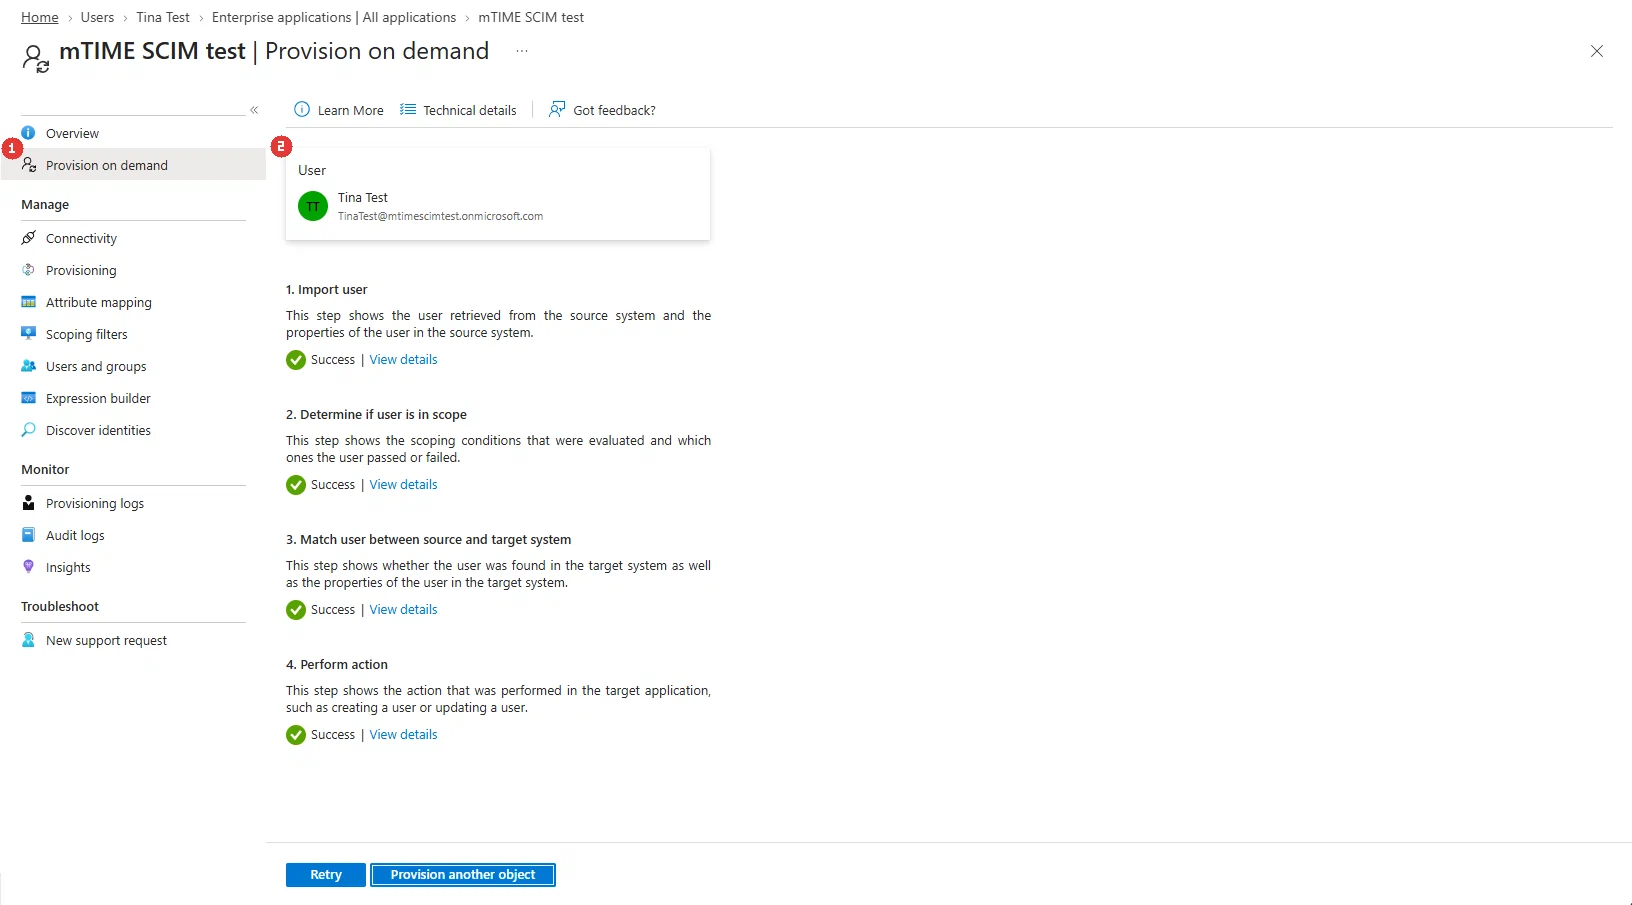
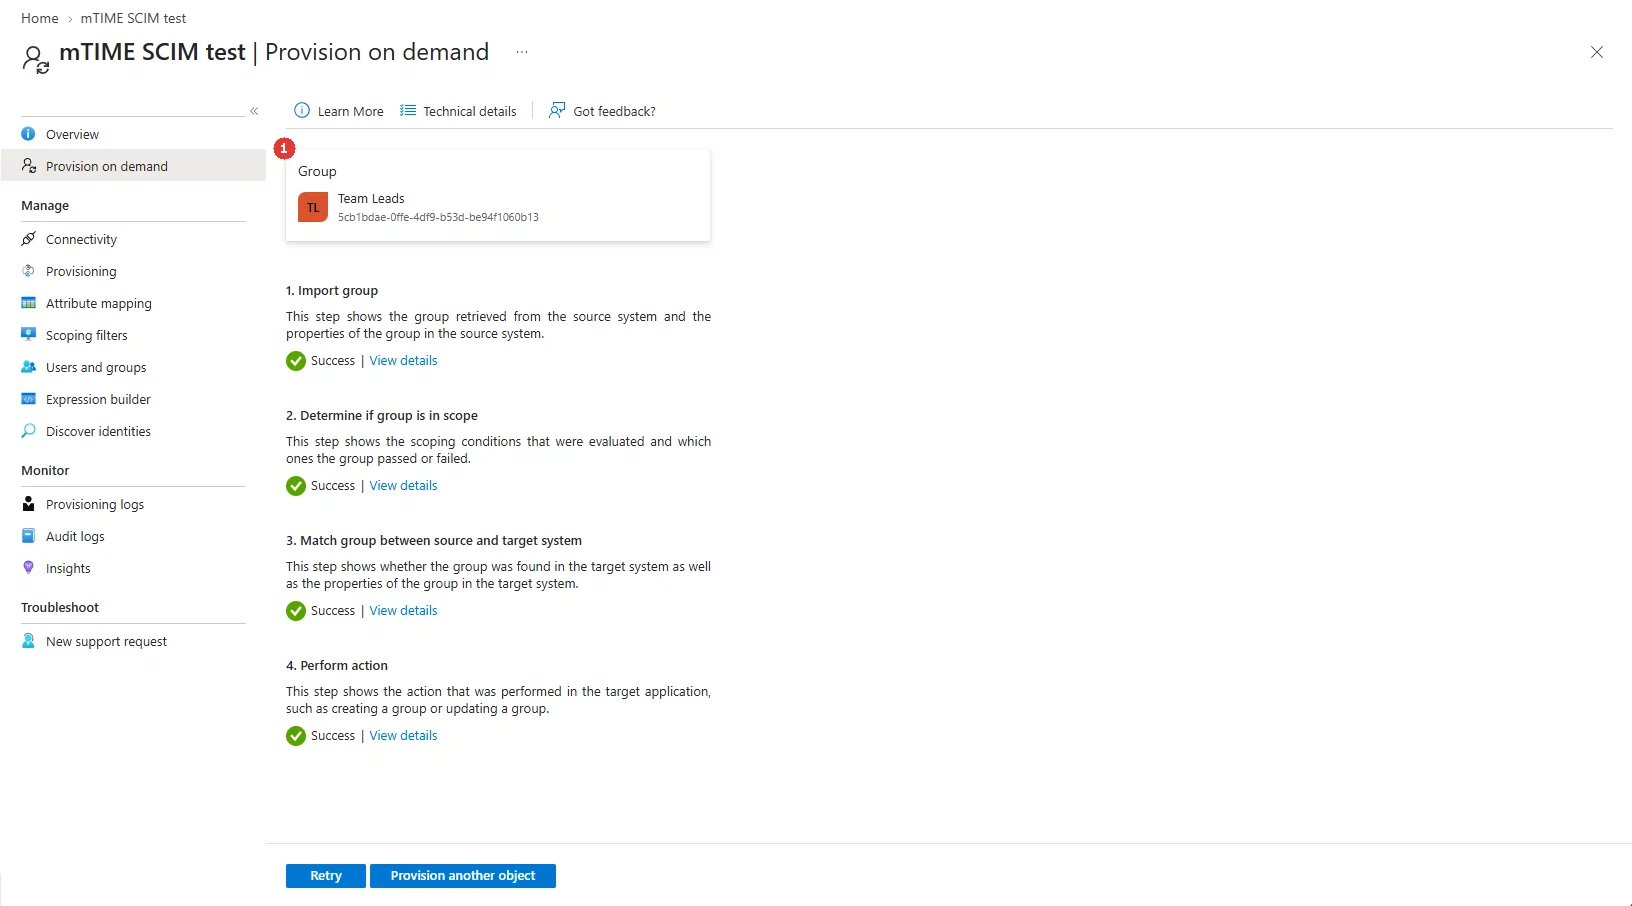
- Open Provision on demand (1) at the top of the provisioning pane’s menu, pick a test user (2) (assigned in step 8) and provision them. Entra walks through its four stages — import, scope, match, perform action — and every stage must end in Success.

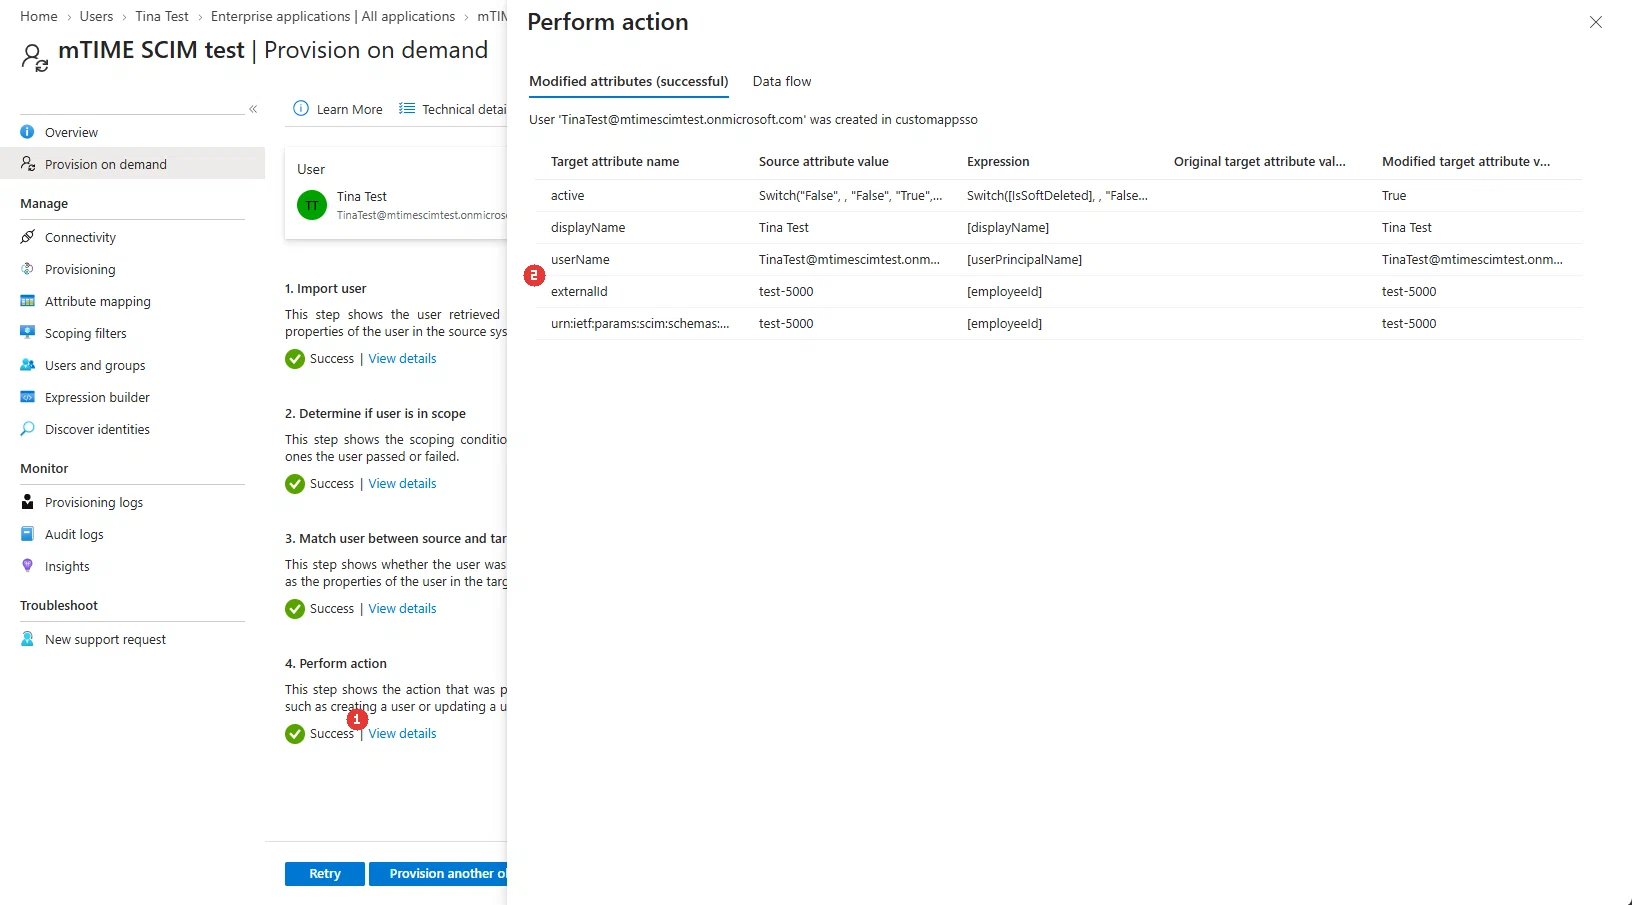
- Open View details (1) on Perform action to see exactly what mTime received. The externalId row (2) only matters if you picked an employee attribute in step 1 — then it should carry the employee number. Otherwise ignore it: an empty
externalIdis normal and nothing fails because of it.

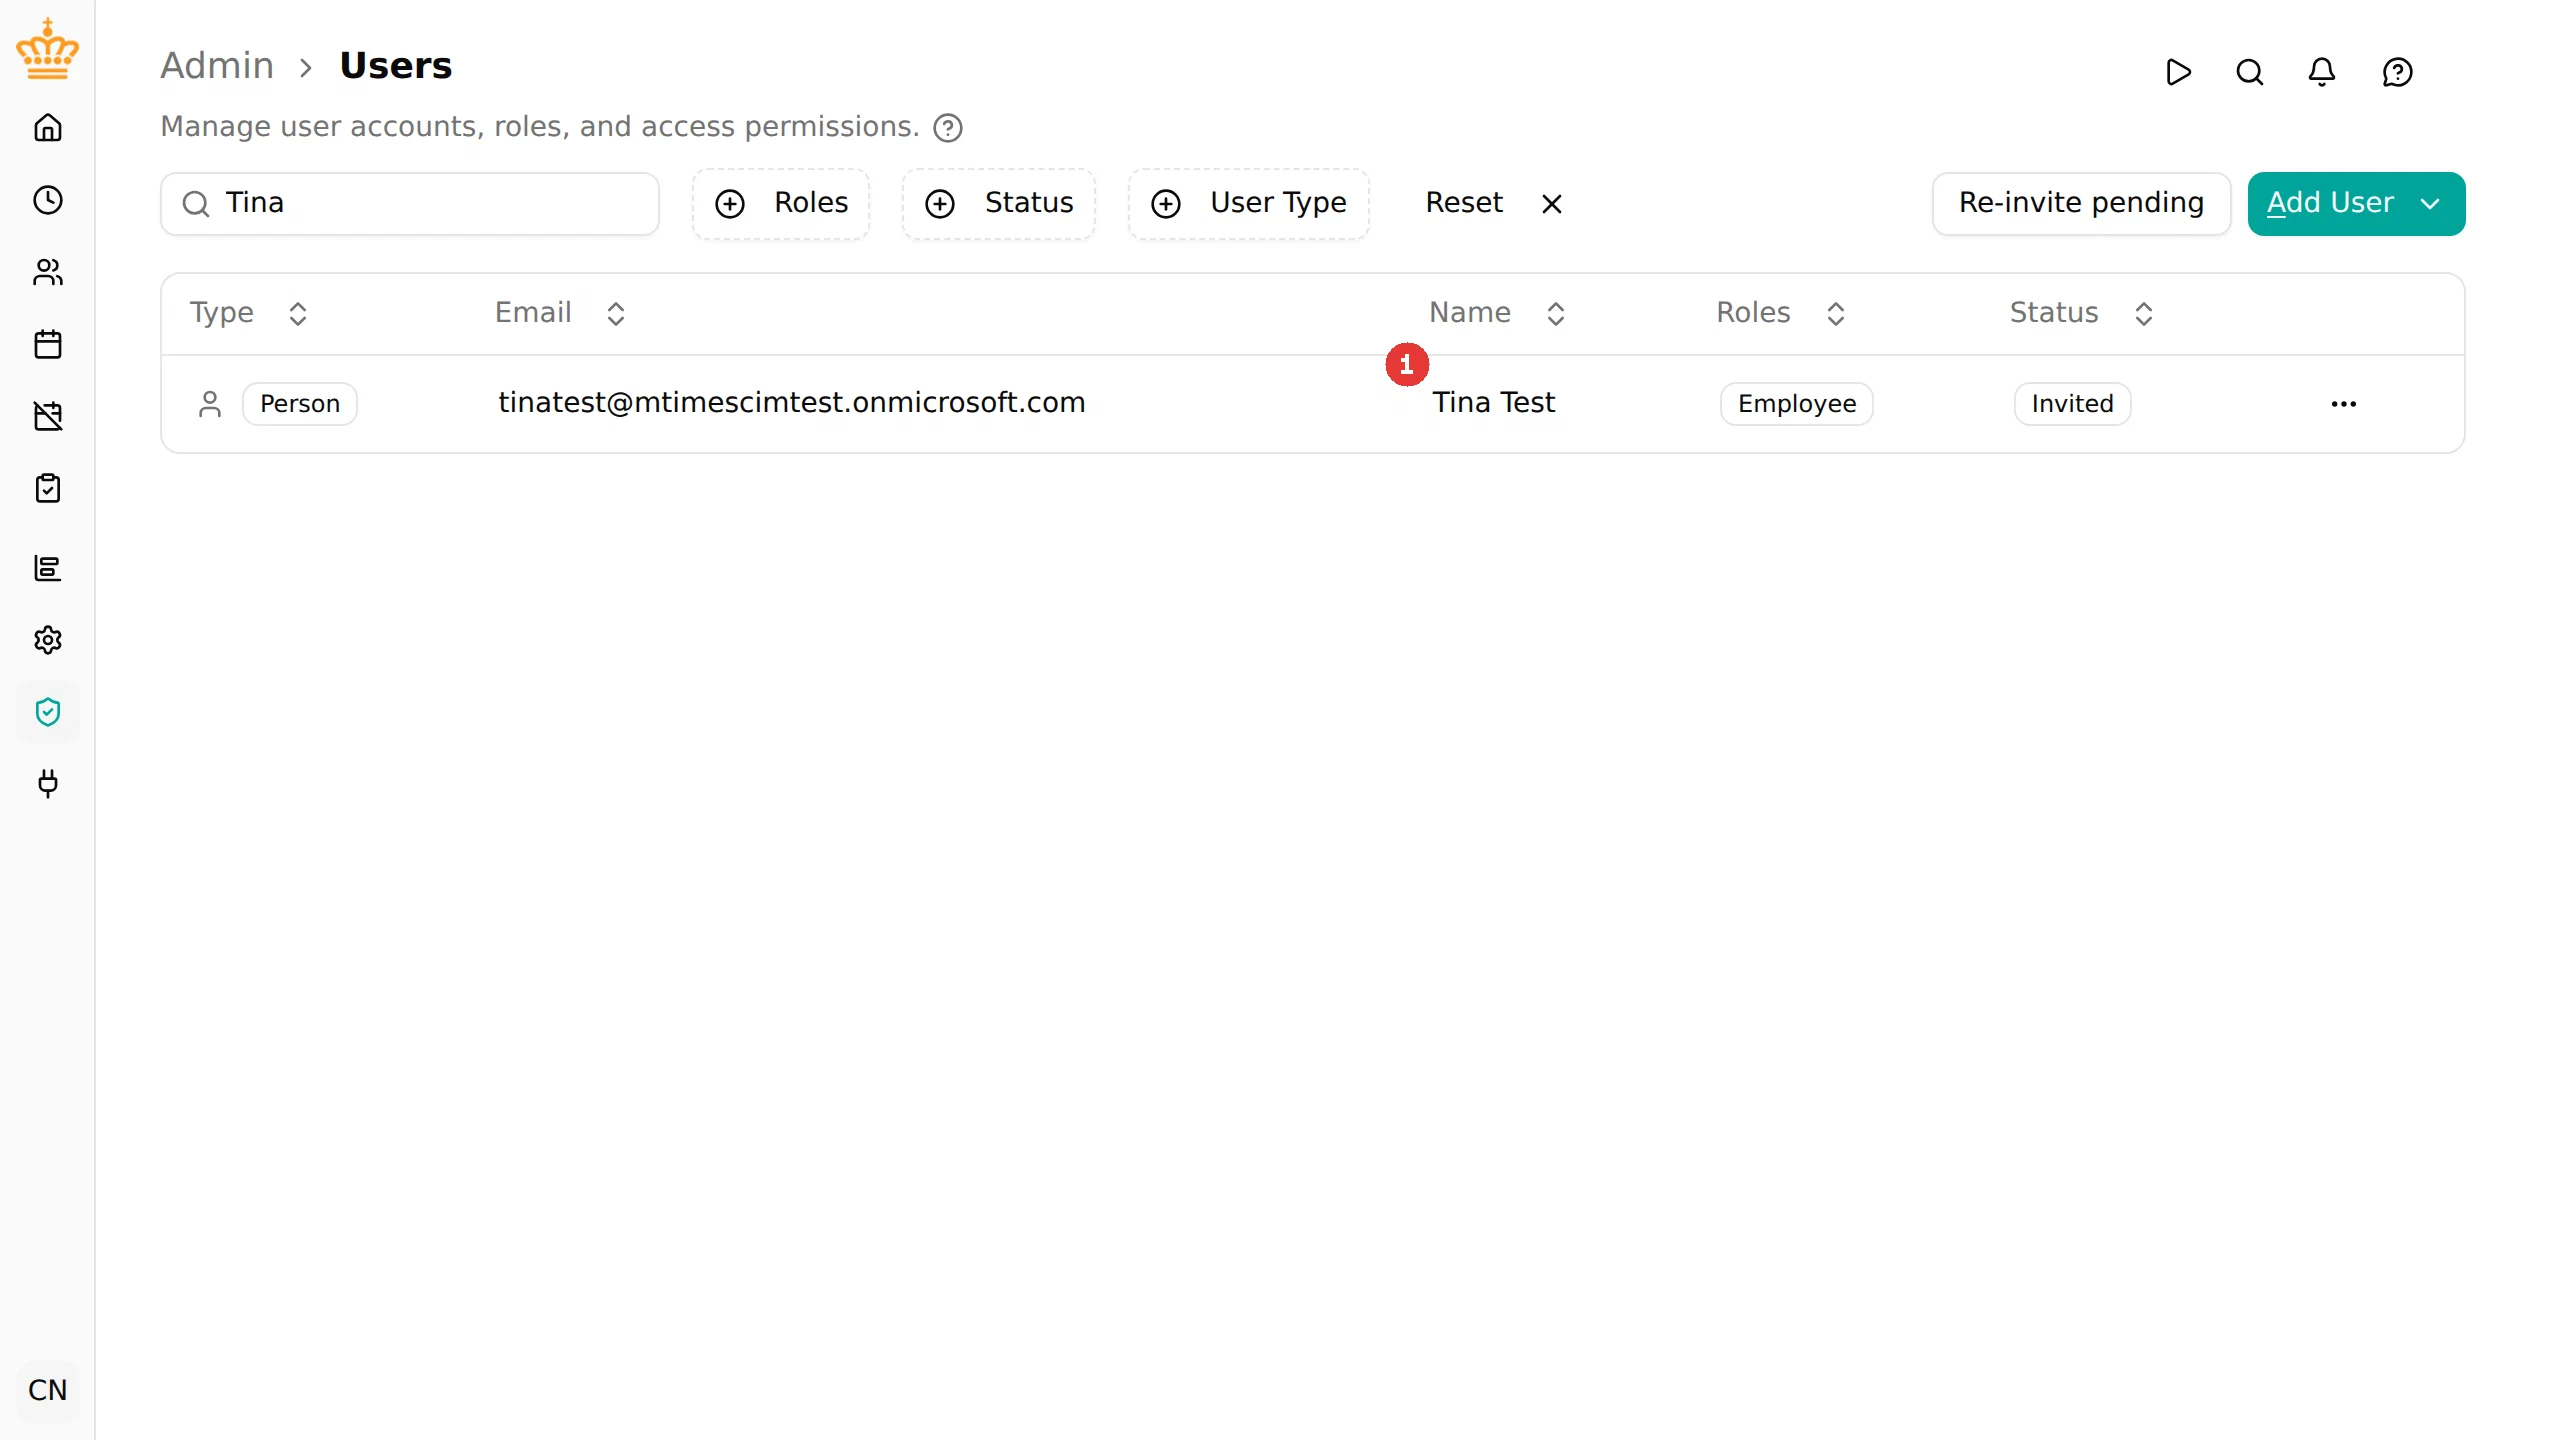
- Now check the mTime side in and open it. The user exists with status invited and holds the employee role (1) (plus any group roles).

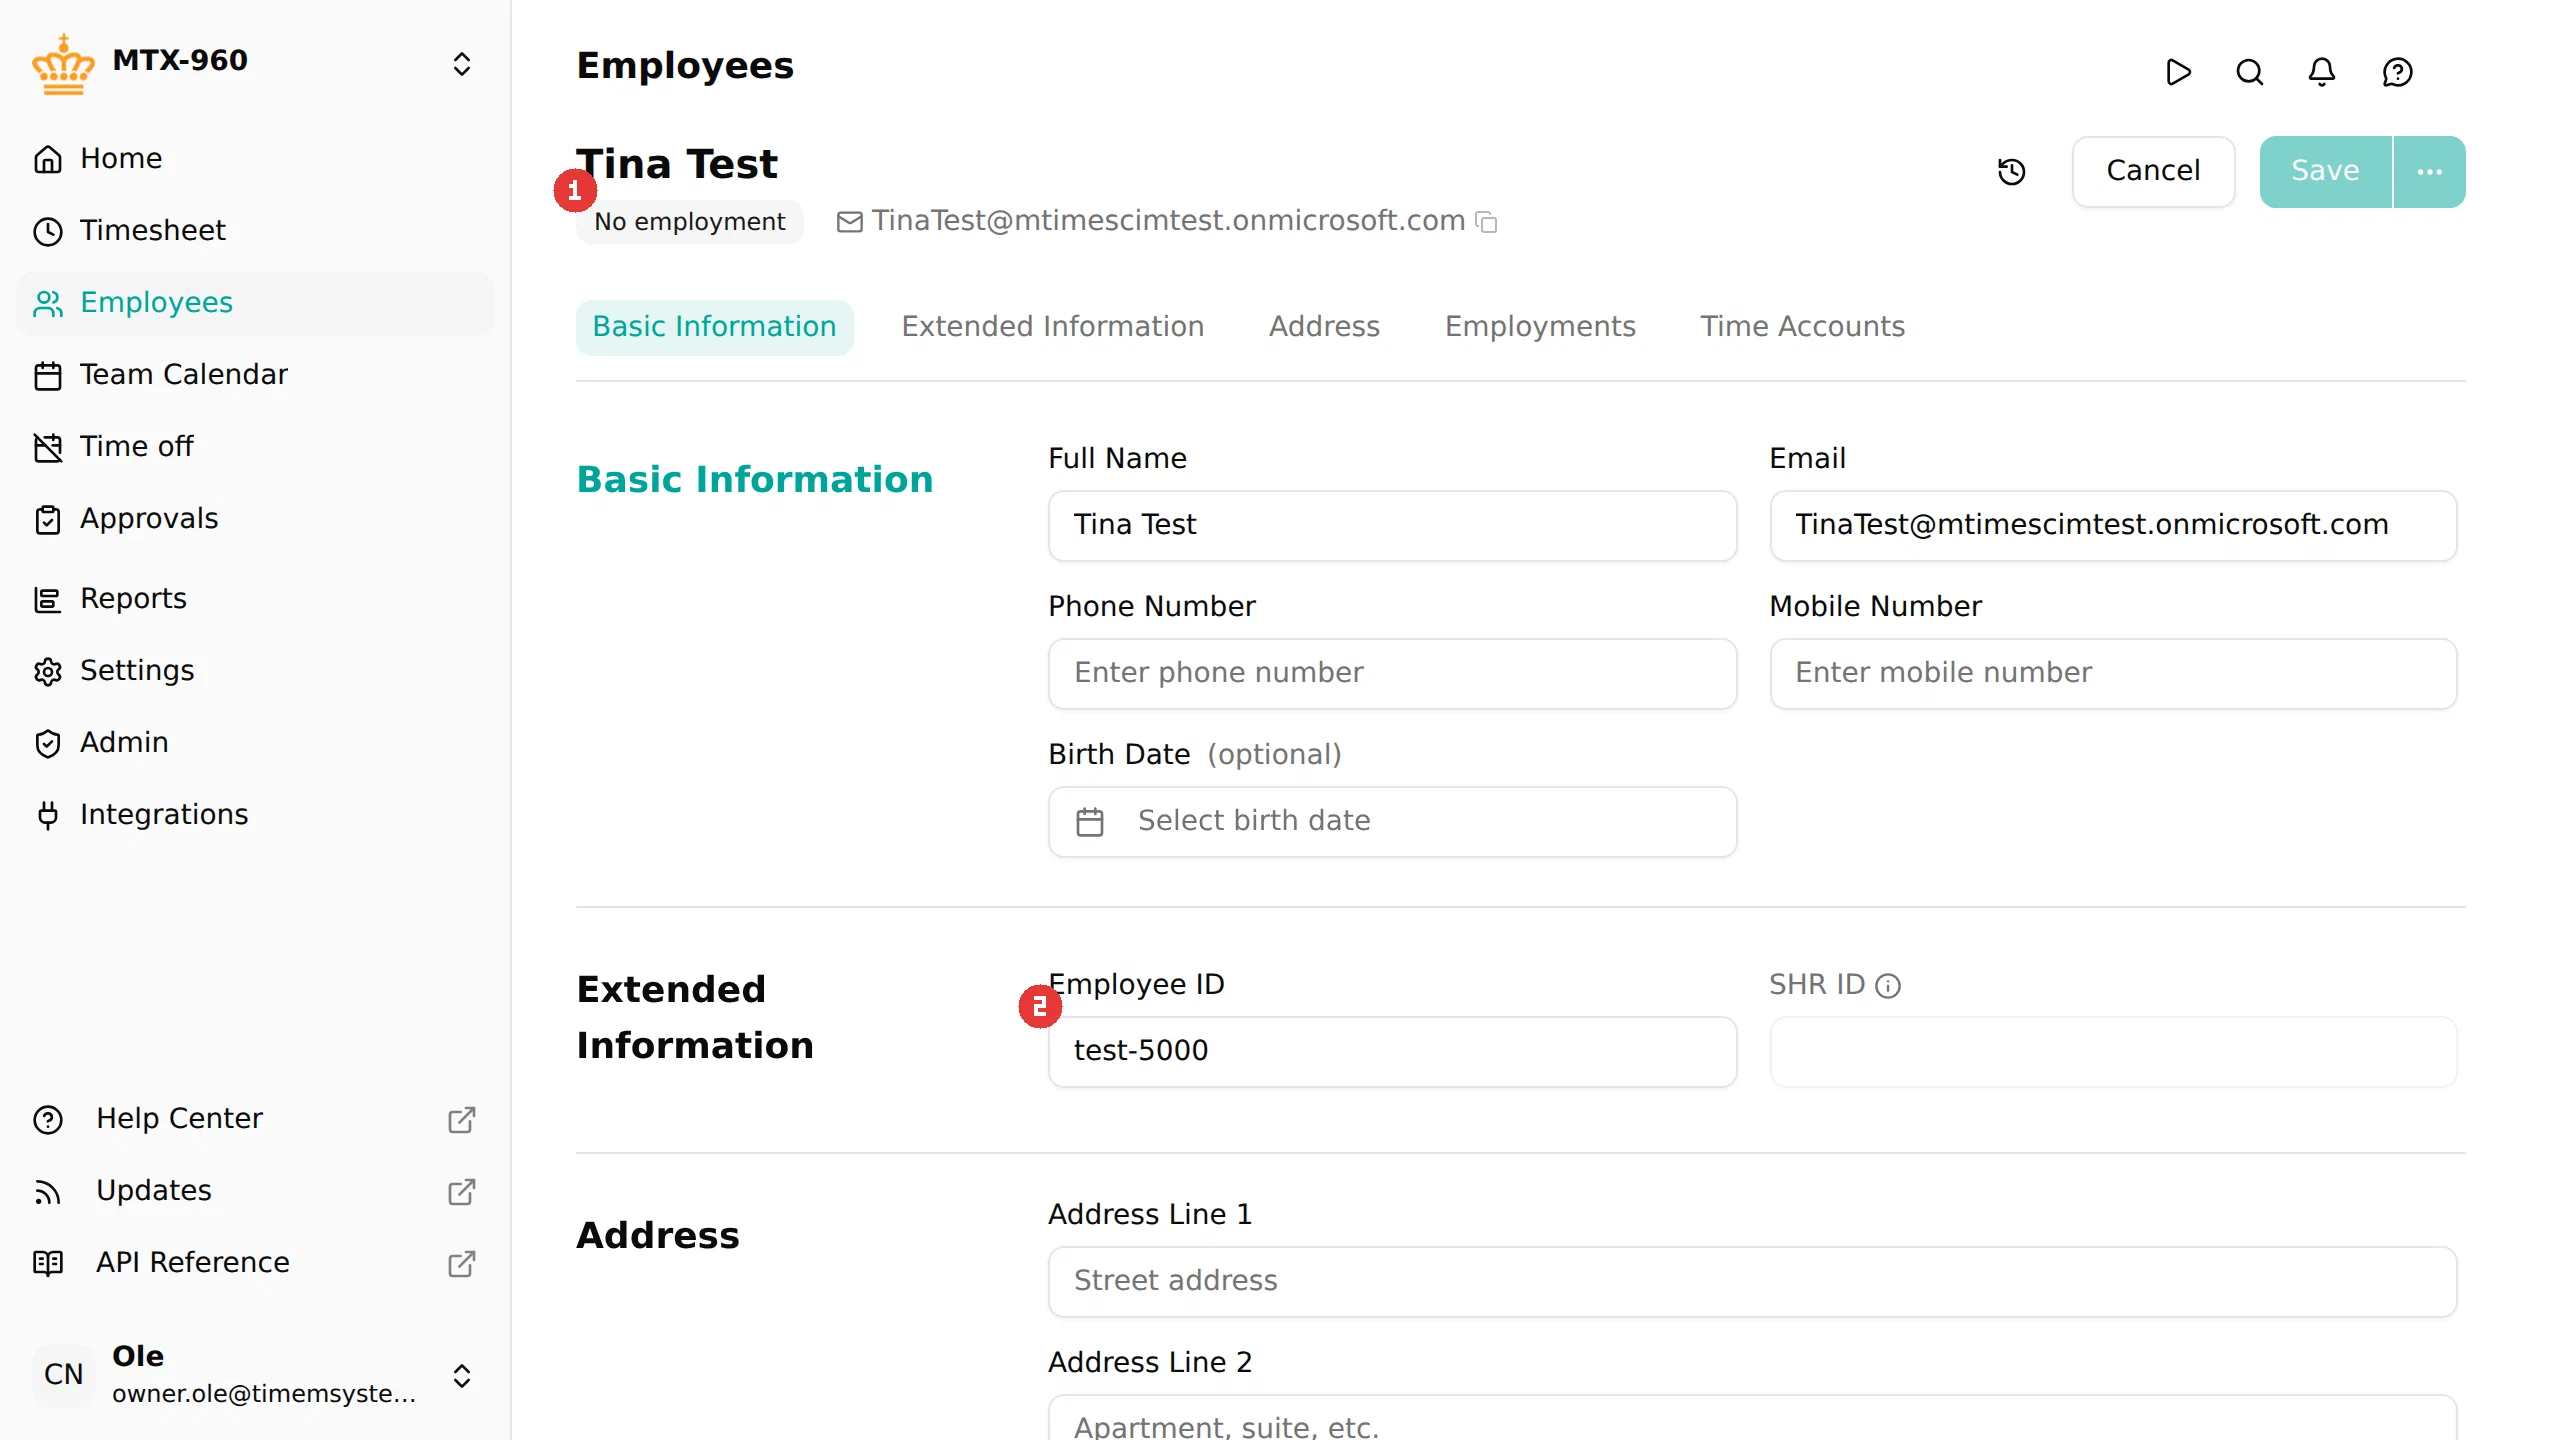
- Open the linked employee: since no employee matched yet, a minimal record was created — no employment (1) (your HR integration enriches it later), with the employee number stored in the attribute linked in step 1 (2).

- Test the group the same way: open Provision on demand again, switch the picker to the Groups tab, and provision the group from step 8 (1). The same four stages must go green.

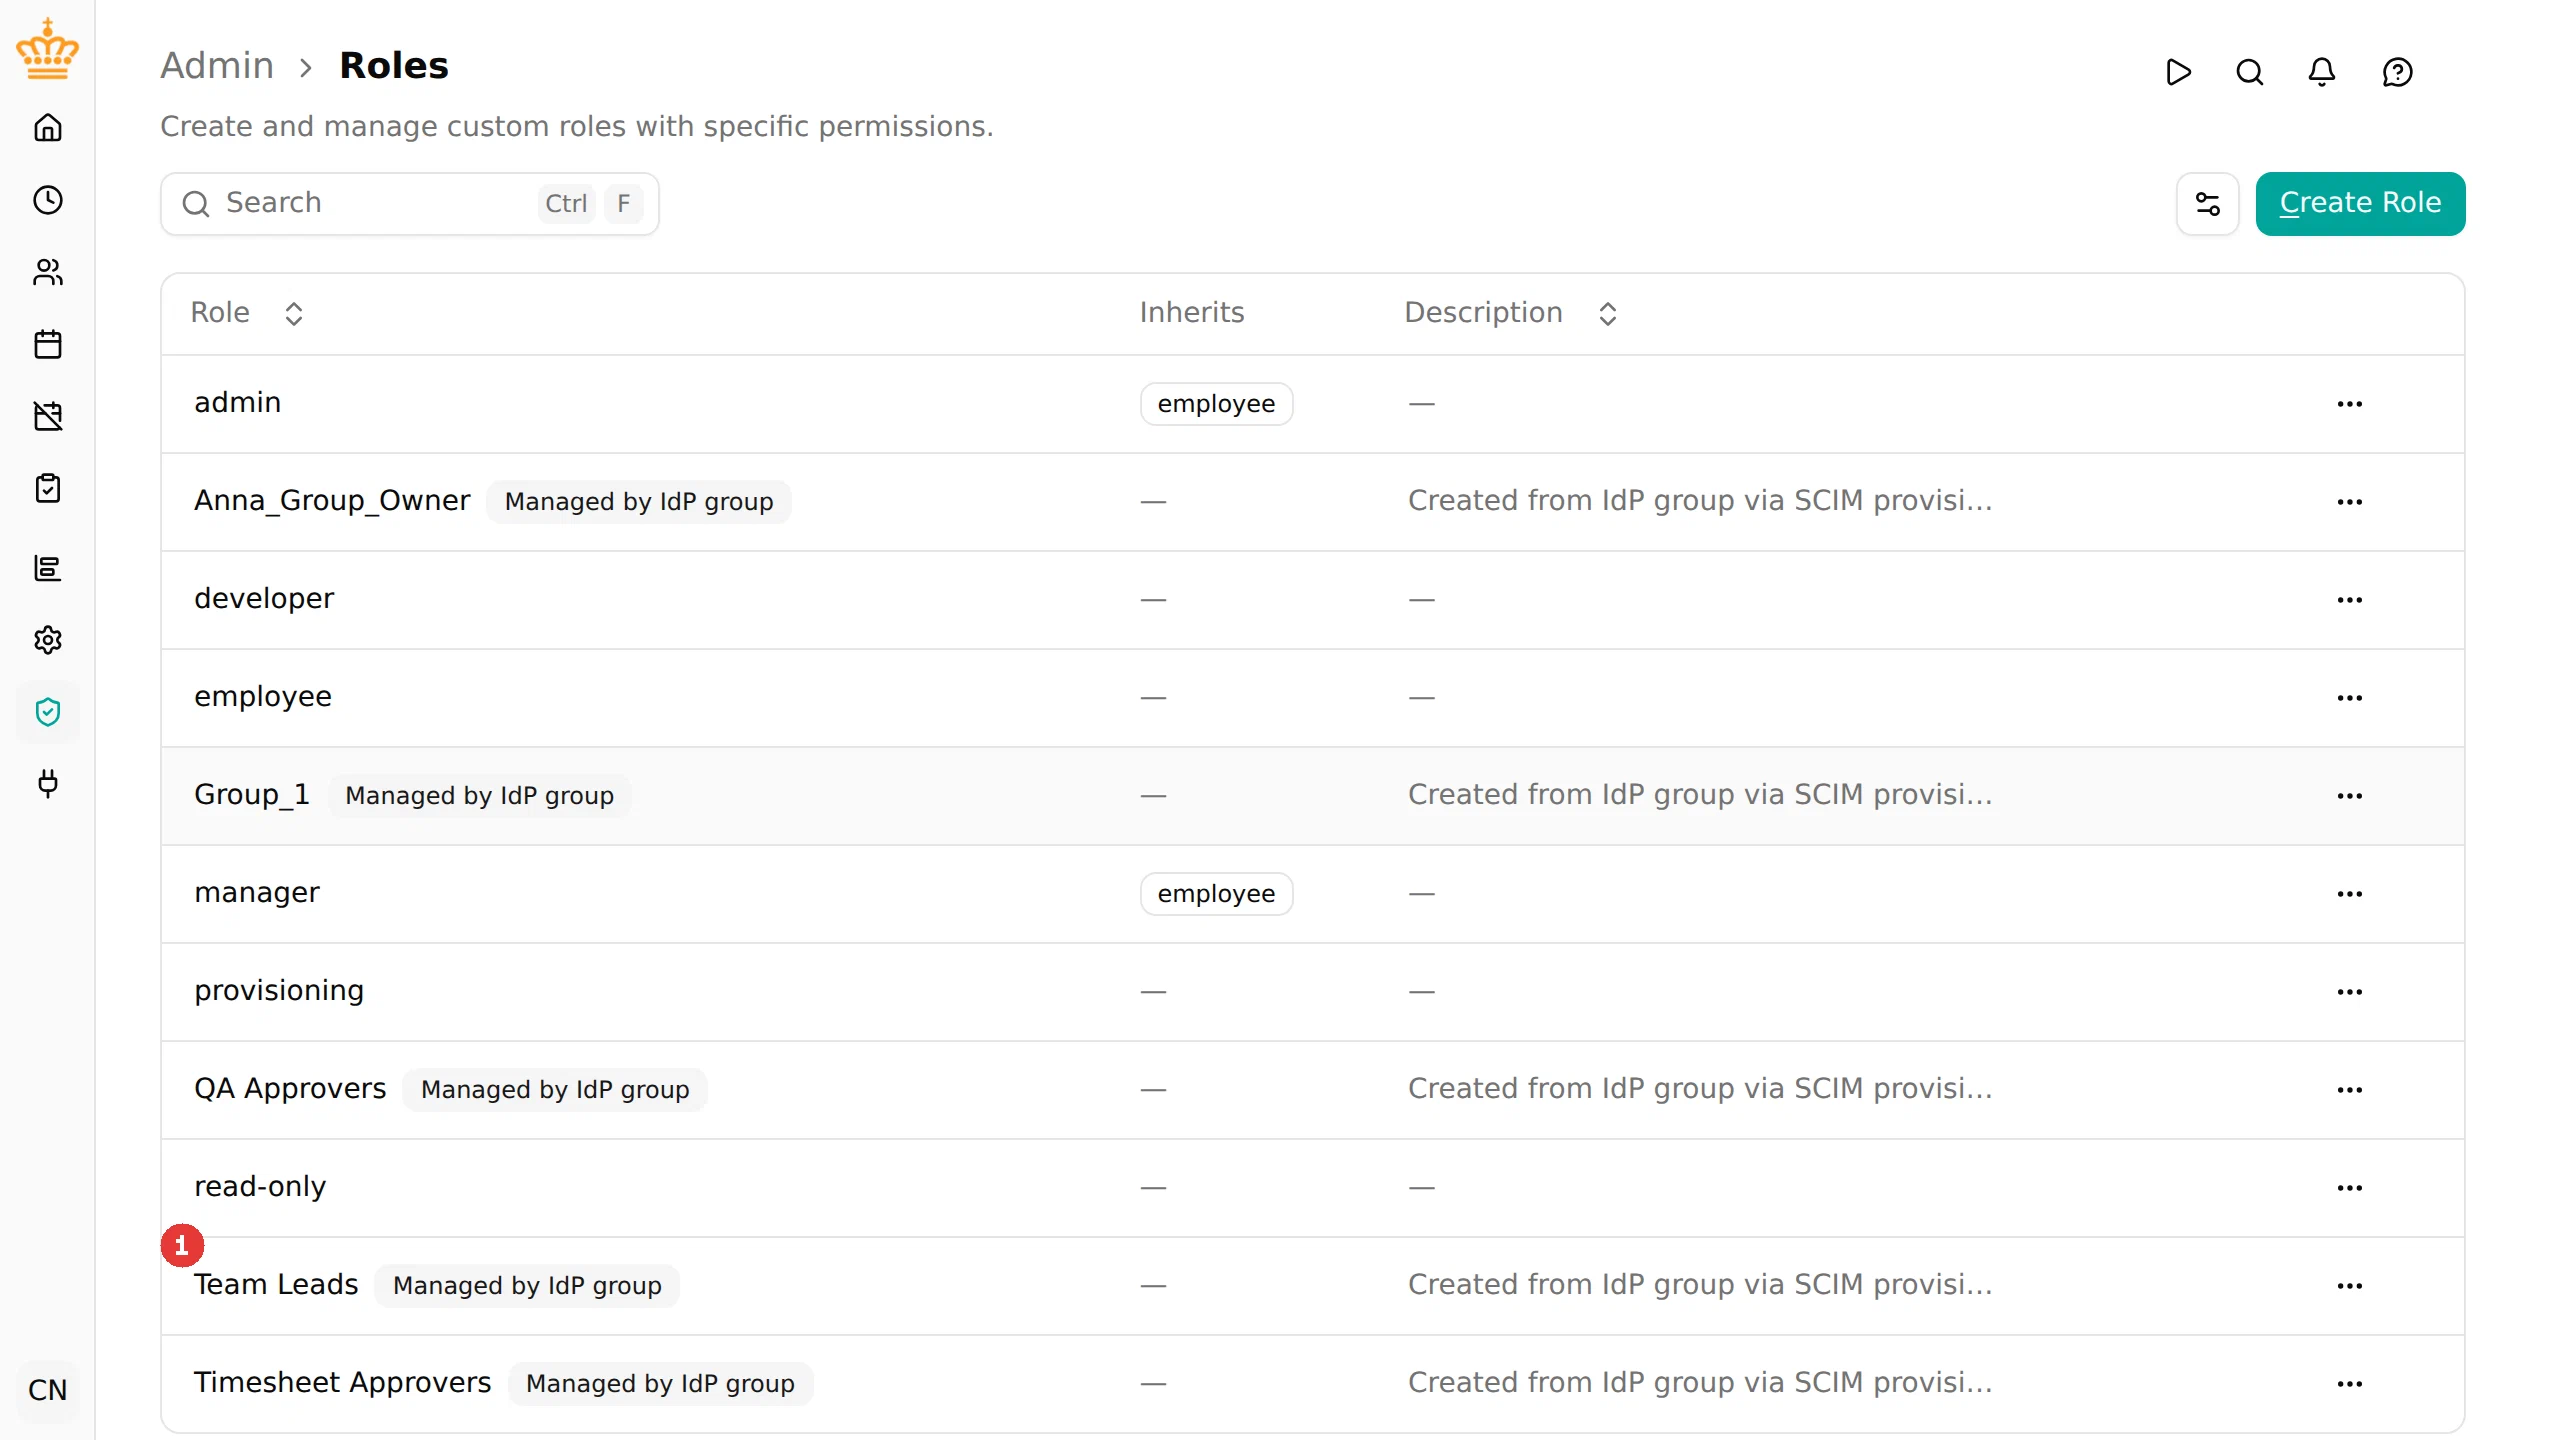
- In mTime, the group arrived as a role on the page, created empty and carrying the Managed by IdP group badge (1), ready for an admin to decide what it may do.

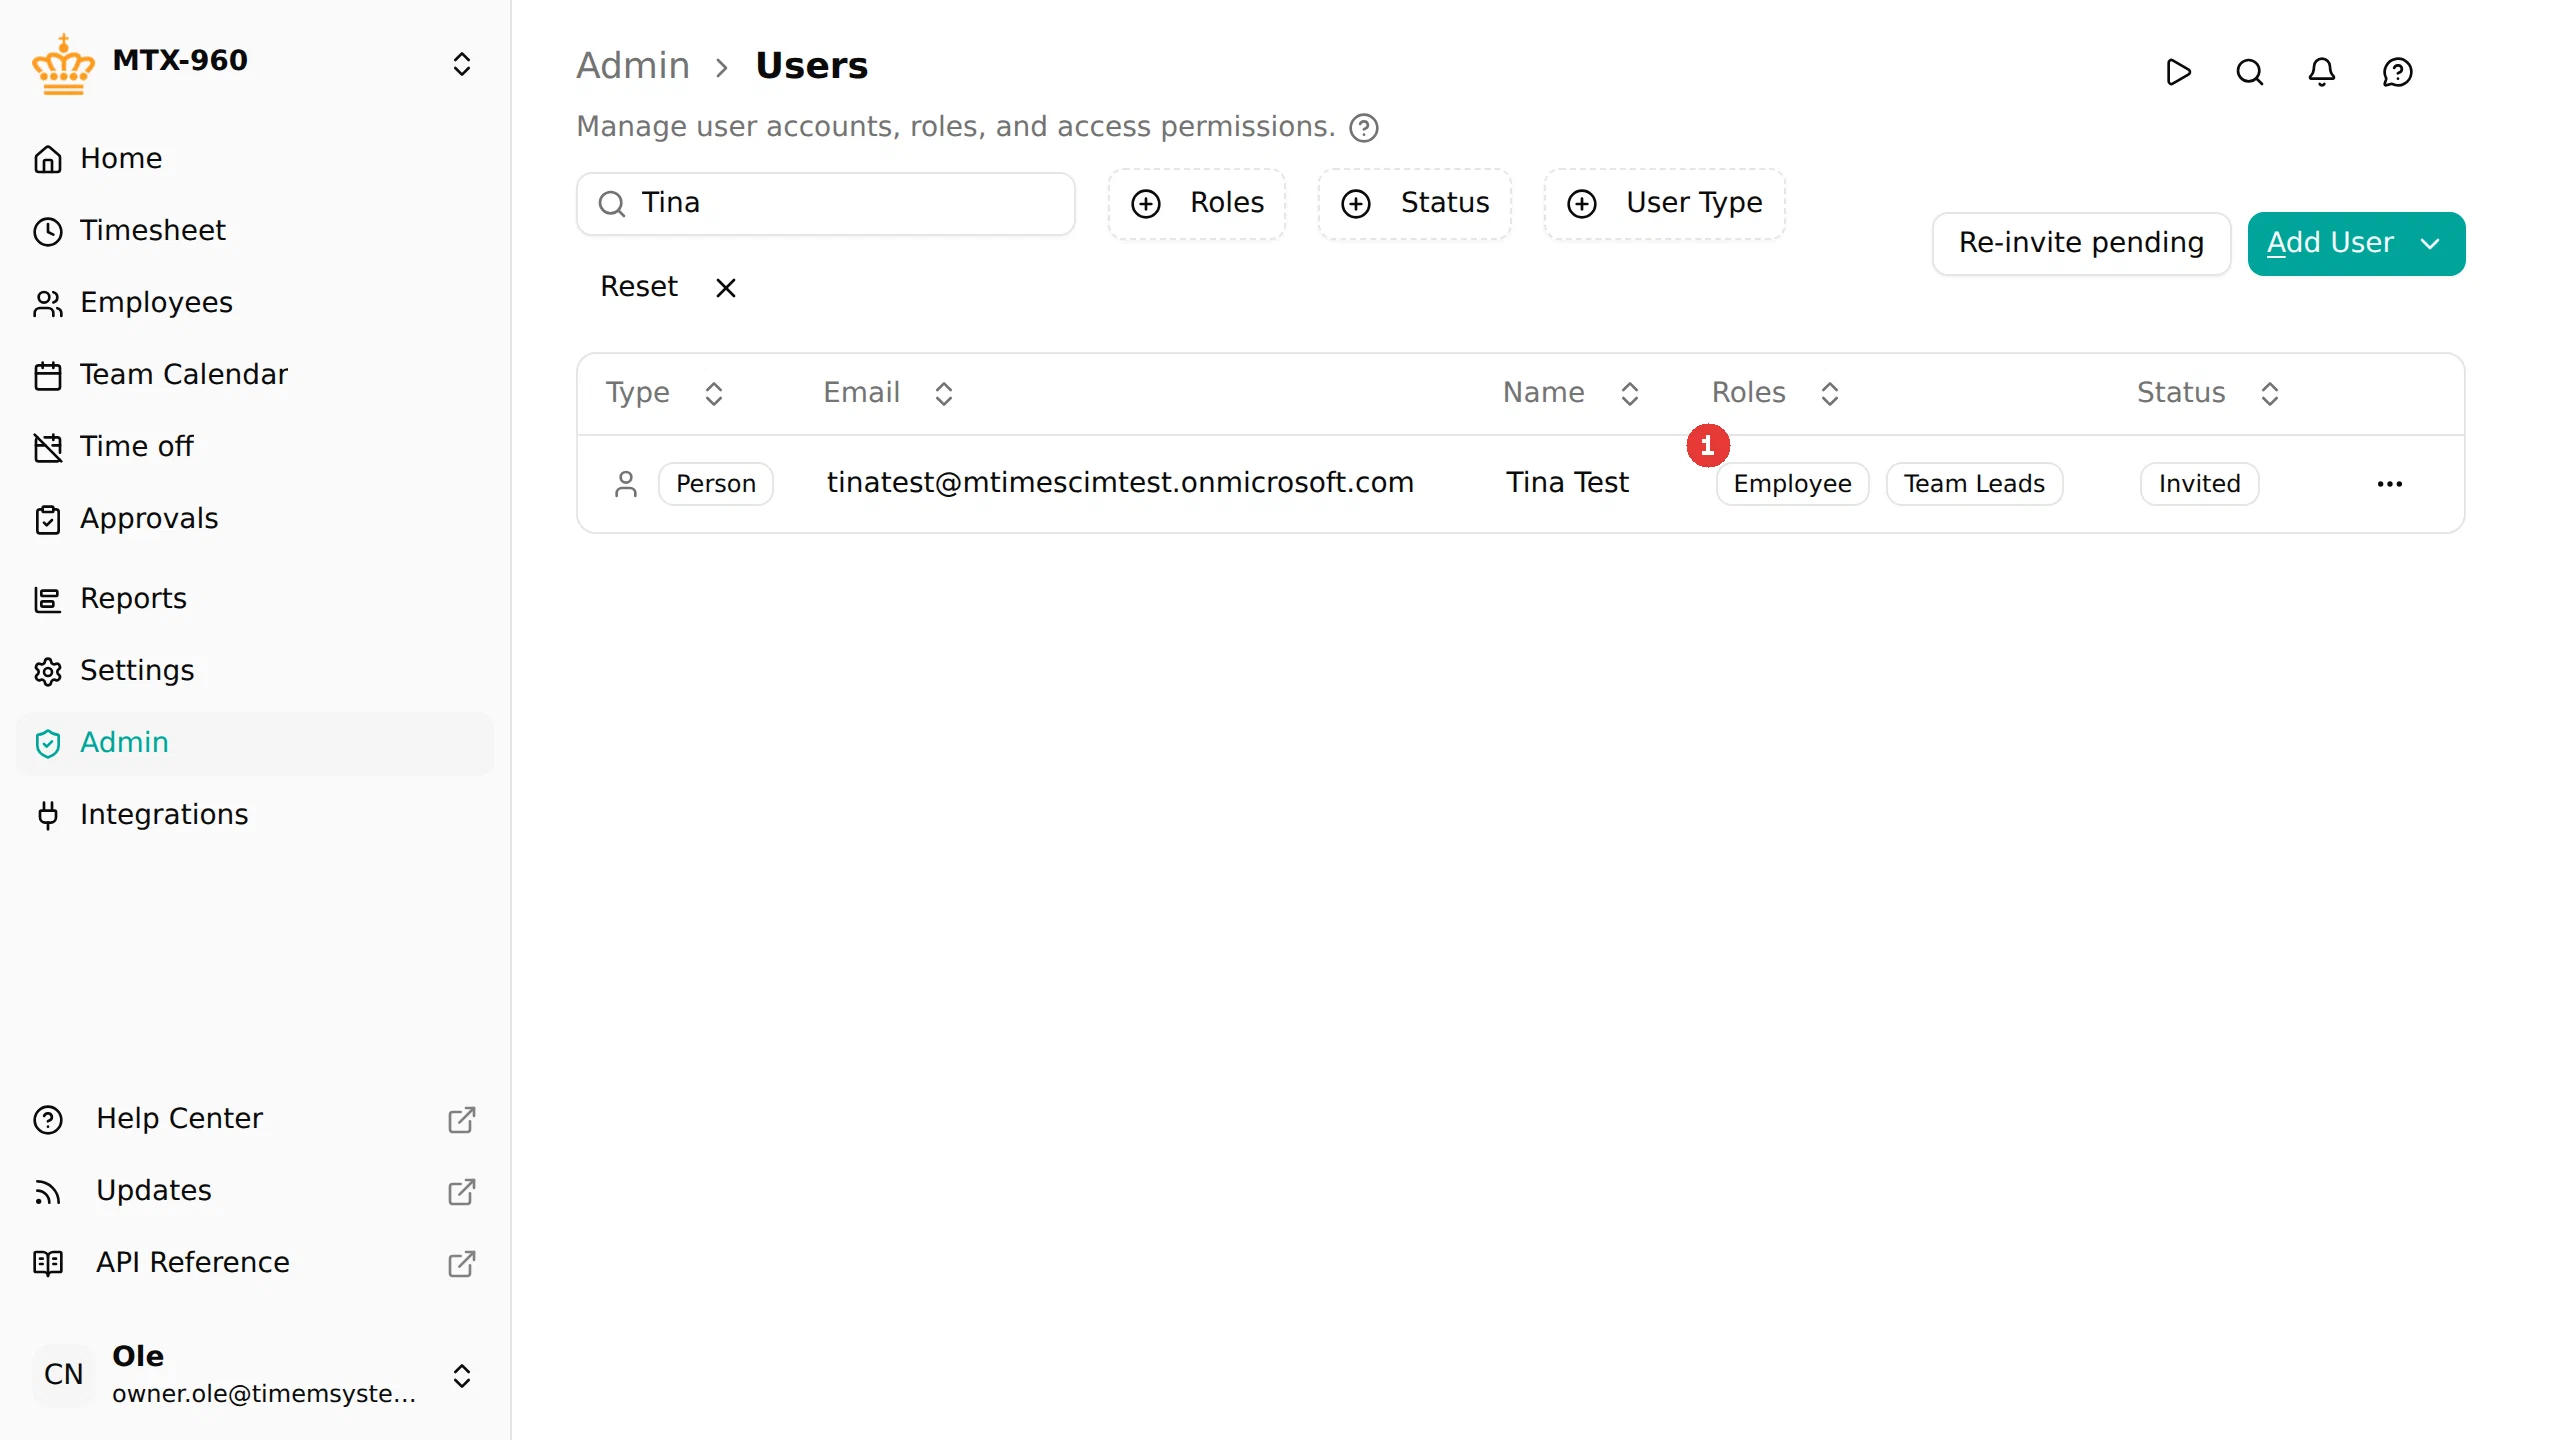
- And the group’s members hold it: the test user now carries the role next to employee (1).

Step 10 — Start provisioning
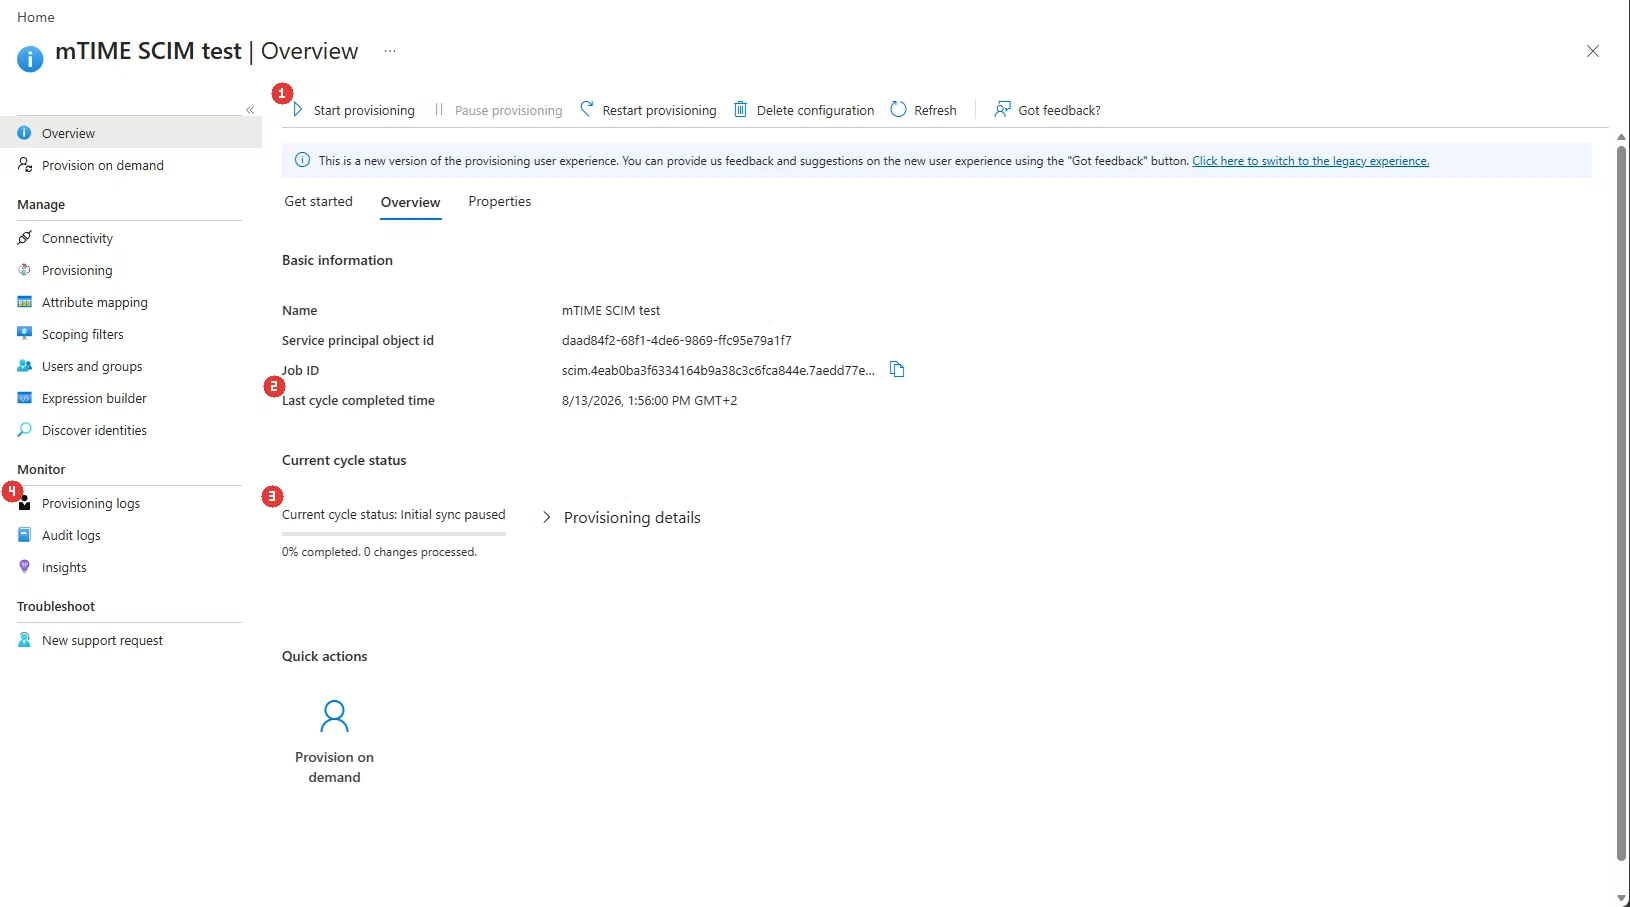
- Back on the configuration’s Overview, click Start provisioning (1) in the toolbar.
- Entra runs an initial cycle covering everything assigned to the application, then an incremental cycle roughly every 40 minutes that applies changes — including the disables and deletes that on-demand provisioning skips.
- The Overview tracks the job: Last cycle completed time (2) and the Current cycle status (3) with progress and changes processed. Pause provisioning and Restart provisioning sit in the same toolbar, and failures appear under Provisioning logs (4) in the Monitor section, each with the reason mTime returned (e.g. “A user with this externalId already exists”).

Step 11 — Verify the lifecycle
Run one full circle to convince yourself it works:
- Disable the test user in Entra (block sign-in). After the next cycle they are suspended in mTime and logged out immediately.
- Re-enable them — the next cycle reactivates the mTime user.
- Remove the test user from the group — the next sync revokes the role in mTime; add them back and it returns.
From here on, user and group management lives in Entra. What each role is allowed to do stays with your mTime admins — see How groups become roles.
Troubleshooting
| Issue | Solution |
|---|---|
| Test Connection fails | See the table in step 5 — wrong token, integration off, or wrong URL |
| “Enable the SCIM provisioning integration before issuing a key for the provisioning service user.” | Turn the integration on (step 1) before creating the API key |
| Group rejected: “The group name “owner” matches mTIME’s owner role, which cannot be managed through SCIM. Rename the group.” | The owner role can never be managed through SCIM — rename the group in Entra |
| “A user with this externalId already exists” | Two different persons carry the same employee number in the IdP — a data error to fix in Entra |
| User created but not linked to the right employee | The linked attribute’s value doesn’t match the number Entra sends (align Link externalId to employee attribute from step 1 with your HR data), or — when matching by email — the addresses differ between Entra and the employee record |
| A duplicate employee record was created | Neither the employee number nor the email address matched the existing employee — align them and let your HR integration merge the data, or link an attribute in step 1 for exact matching |
| Deactivated user still active in mTime | Deactivations only flow through the scheduled cycle — wait for the next cycle (or check that provisioning is started), don’t test this on demand |
| Group didn’t become a role | Check the group is assigned to the application (step 8) and appears in the provisioning logs |
| Membership change to an existing role has no effect | The role isn’t opted in — add Provisioning under the role’s Can be assigned by |
| “A provisioning service user already exists in this workspace.” | There can be only one — reuse it, and rotate credentials by creating a new API key instead |