Timesheet
Track your daily work time by activity in the timesheet view.
Overview
Use Timesheet to register hours directly in a weekly grid:
- Rows represent activities (for example, General)
- Columns represent days
- Totals and the difference from expected time are calculated automatically per day
Navigate to in the sidebar.

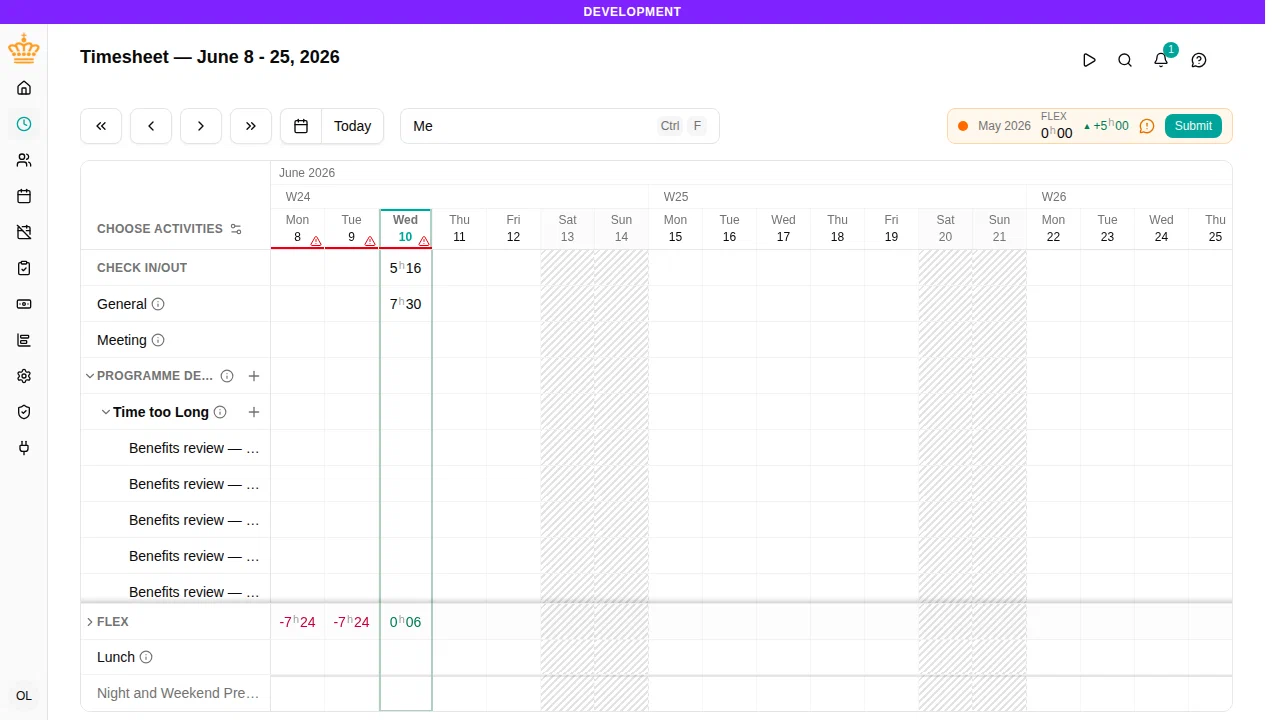
Entering time
Each editable cell represents one activity on one day.
- Click a cell in the grid
- Enter the time you worked for that activity
- Move to another cell or click outside the grid to save
The value is saved automatically when you leave the cell.
Time format
Timesheet accepts the time format configured in your preferences. Depending on your separator setting, examples may look like:
7:307,57.57h30
If a value is invalid, the cell is highlighted until you correct it.
Activities
The activity rows come from your workspace’s configured work activities. Each row shows the time registered for that activity on each day.
Time off activities are not edited in Timesheet. They are managed through time off requests and related workflows.
Projects and tasks
When your workspace books time on projects, time is never entered on the project itself. It is entered on a task — an activity the project books — and the project is the row that holds those tasks and totals them.
An activity that needs a project has a row of its own, even before you have picked one. It takes no time; the projects booked on it hang beneath it. Its Add a project is how you add one: choose the project, and the pair appears under the row.
A project stands where its work stands. Booking a single task, it sits under that task’s row. Booking several tasks from one group, it sits in that group and holds them. Working in two places, it appears in both, holding what it books in each.
A group that holds nothing but project work is shown as one line. Its tasks are not listed — nobody books them directly — and its Add a project asks for the project first and then the task. The projects you pick stand beside that line.
A project shown on one line names the work it books when the row above it does not already say so. The + on a project row adds another task to that project, and the ⓘ shows the project’s description.
Choosing your activities
Choose Activities in the grid header opens My activities, where you decide which rows the timesheet shows.
- Search finds an activity, a project, or both at once — type time test to find the task Test on every project whose name contains time. Results are grouped under what contains them: the parent for an activity, the project for a task. Tick a row to turn it on; the box on a group’s heading turns the whole group on or off.
- Mine lists what is on, grouped under projects and parent activities.
- Favorites lists what you have pinned to the dashboard. The star on a row pins it — and turns it on if it was not.
- All lets you browse the whole catalogue one level at a time, with projects shown where their tasks live. Long lists are cut at twenty; Show 20 more reveals the next page.
Automatic entries (like the lunch break)
Some entries are filled in for you, based on your check in/out times and your workspace’s rules. The most common is an automatic lunch break — when you are checked in across the lunch window, an unpaid break is deducted for you.
The break is previewed as soon as your time covers the lunch window — even while you are still checked in — so the current day’s total and difference already account for it, matching the Today card on your Home page.
Automatic entries appear as ordinary cells, so you can adjust them:
- Change the amount — type a new value in the cell (for example, change a 30‑minute lunch to 20 minutes).
- Remove it — clear the cell (leave it empty or enter
0). Removing the automatic lunch means the whole time you were present counts as worked time, with no break deducted for that day.
When you remove an automatic entry, it stays removed for that day — it will not come back the next time your timesheet updates. This applies to that day only; other days keep their automatic entries as usual. If you instead added the entry yourself and then clear it, the automatic version can return on a later check in/out.
If you change your mind, you can bring a removed automatic entry back: its cell shows a small restore button (a circular arrow). Select it and the automatic entry is calculated again for that day.
Worked total and delta
At the bottom of the grid, Timesheet shows two summary rows:
- Total sums the day’s work and time-off hours. Non-work activities (such as lunch breaks) and allowances are not included
- Difference compares worked time with the expected work time for that day
When your employee record has a work time norm, the difference helps you see whether you are above or below the expected number of hours.
Navigating the grid
Use the toolbar above the grid to move through time:
- Previous/next week buttons
- Previous/next month buttons
- Today to jump back to the current period
- The calendar button to jump to another month
You can also use keyboard navigation:
Left ArrowandRight Arrowmove between weeks when you are not editing a cellTabfocuses today’s first visible entryTjumps back to today
A vertical line runs down the grid wherever one month ends and the next begins, so the change of month is visible even when the 1st falls on a weekend.
Time off in the timesheet
Time off periods (vacation, sick leave, etc.) appear in their own collapsible section in the grid. These entries are read-only — they cannot be edited from the timesheet because they are managed through time off requests.
A time off activity that is not tied to a time off policy is different: you register it directly in the grid, like any other activity. That works on future days too, so time off you know about in advance — a funeral next week, say — can be entered ahead of time. Your work time policy’s limits on registering days further back still apply.
Time off hours contribute to the total and the difference, so the daily totals reflect all your registered time including approved time off.
Mobile timesheet
On mobile devices, the timesheet switches to a touch-optimized view:
- Swipe left and right to change days
- Collapsible calendar at the top for quick date navigation
- Summary cards showing total, expected, and difference for the day
- Separate sections for work activities, time off, and other entries
- Check in/out section for quick time tracking
All the same data is available — the layout is adapted for smaller screens.
Timesheet approval
If your employment terms or any of the projects you book on require timesheet approval, every period you still owe gets a chip in the toolbar showing its status (Ready, Awaiting approval, Reopened, …). Click a chip to open the statement details sheet, where you submit the period and track its progress. Each period is also marked across the calendar header, so you can see which columns belong to it — click that band to open a period you have already submitted.
See Timesheet statements for the full submit, reopen, and approval workflow.